About integrating Facebook Ads with LeadsBridge
LeadsBridge is a third-party tool used to automate marketing and sales flows.
LeadsBridge supports different Facebook Ads products such as Facebook Lead Ads, Facebook Custom Audiences and Facebook Offline Conversions.
Facebook provides an Inline CRM integration within the Facebook Page Publishing Tools where you can use the LeadsBridge’s Facebook Lead Ads connector.
How LeadsBridge works
LeadsBridge automates marketing and sales flow by connecting a source (i.e. Facebook Lead Ads) with a destination (i.e. a CRM, Salesforce) avoiding any manual importing task and allowing salespeople to reach leads as soon as they come in.
Advertisers generally use LeadsBridge to improve their Facebook advertising results. Learn more about LeadsBridge here.
Start your free trial
LeadsBridge offers a free trial in order to let users see first-hand the benefits of using it. You can learn more about the most updated plans and prices here.
Be aware that LeadsBridge (LeadsBridge Inc.) and Facebook (Facebook Inc.) are not associated.
You need to complete LeadsBridge account along with your billing information in order to use LeadsBridge and keep Facebook Ads products (i.e. Facebook Lead Ads) connected with your CRM or email software.
Every LeadsBridge plan comes with a free trial period of 7 days, allowing you to sync a limited number of leads.
Before the trial expires, you can complete your profile with billing information and keep automating your flows upgrading to a paid plan.
Get an exclusive discount during the trial
If you are using LeadsBridge within the Facebook Publishing Tools interface, you may have a discount when you complete your profile along with your billing information before the trial period expires.
However, be aware that if your 7-day trial period expires or you reach the maximum amount of leads that you can sync, the bridge syncing process will be interrupted if you did not complete your profile along with the billing information.
Pricing Terms
About plans & pricing
Every LeadsBridge plan comes with a certain number of bridges you can use and may have lead/contacts syncing limitations. We offer plans that scale based on how much you need to automate.
More details about LeadsBridge pricing are available on our pricing page.
Enterprise Premium integrations
Enterprise level tools come with advanced automation, segmentation and filters capabilities, such as lead distribution, data-points configuration, and many others.
You can have a full updated list of Enterprise level tools here.
If you need more information regarding Enterprise grade integrations, contact us here.
Custom Integration Service
LeadsBridge integrates with your custom solution or in-house CRM offering a variety of advanced integration methods.
The best way to understand if your custom tool can be supported by LeadsBridge and how to integrate it, is to reach out to our Specialists by booking a meeting with them here.
How to complete your profile
If during the trial period you are happy with LeadsBridge and you’d like to keep automating your flows, you can easily complete your profile here along with your billing information. In this way, when the trial expires, your account will be automatically upgraded to a paid plan without any service interruption.
If you are encountering any problems in setting up your bridges, always feel free to contact us, our Customer Happiness Team will be more than happy to assist you!
Cancellation and Invoices
LeadsBridge comes with no contracts, and you can cancel your subscription at any time for any reason.
We are always keen on getting feedback from our clients, so please feel free to share your experience with us, it will help us to continuously improve LeadsBridge!
If you need to see or download invoices for your business, please verify the right information is populated on the billing section here.
How to use the Inline CRM integration with LeadsBridge
This is a simple guide on how to set up the bridge and connect Facebook Lead Ads with your CRM/Email software through the Inline CRM integration hosted on your page’s Publishing Tools.
Below a step by step video tutorial, if you prefer a written guide, you can find it below the video.
Before you start
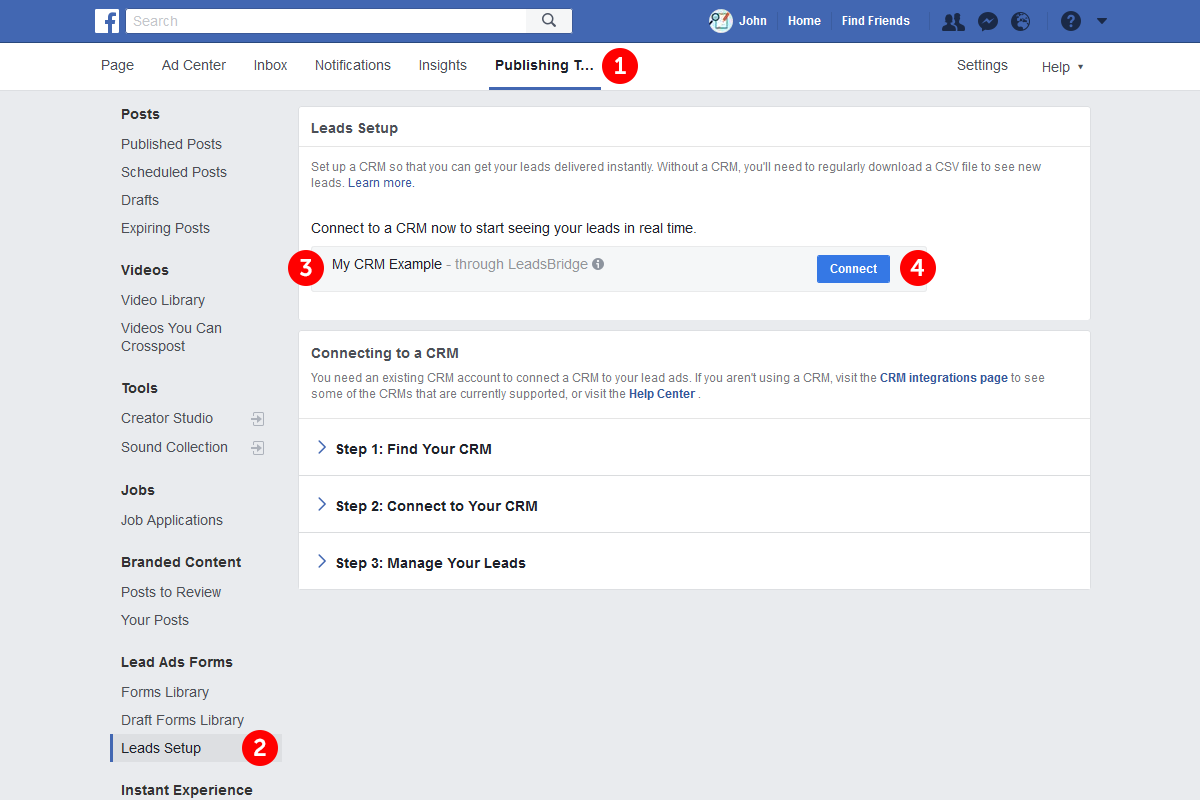
- Head over your Facebook Page's Publishing Tools tab
- Visit the Leads Setup section.
- Use the search box to find My CRM Example
- Click Connect
Step 1: Account information
If you already have a LeadsBridge account but it's not associated with your Facebook profile, Sign In with your credentials and start the configuration.
Otherwise, click Login with Facebook to begin.
- If you don't have a LeadsBridge account yet, a new one will be created
- Allow LeadsBridge to access your Facebook information to proceed
- Confirm your details like Name, Email, and Phone when prompted
- Click on the Next button

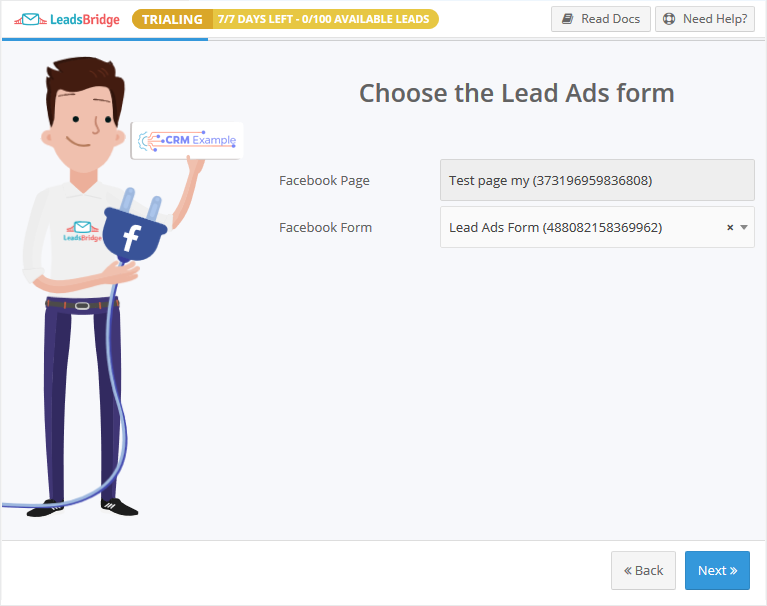
Step 2: Setup your Facebook Lead Ads source
- Select the Facebook Lead Ads Form from the dropdown
You may also connect all your Lead Ads Form at once by choosing the "All Facebook Lead Ads Forms" option. - Click on the Next button
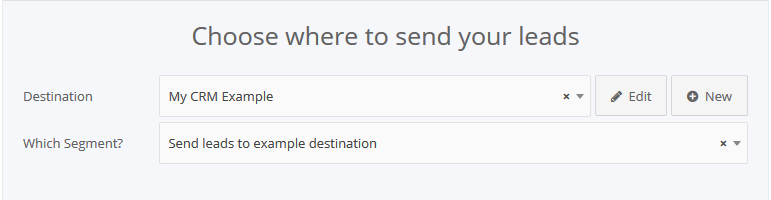
Step 3: Setup your My CRM Example destination
- Enter your details where you want to send your leads
- Click on the Next button
- You'll now be able to select the destination segment to send your leads to
- You may choose to receive an email receipt for each incoming lead.
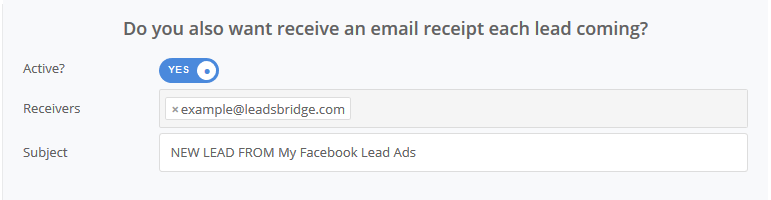
- Type the address(es) where you'd like to receive the receipt
- You may also modify the Subject line of the email
- Click on the Next button
Step 4: Fields Mapping
Here you'll be able to map your source information with your destination fields.
You'll see a field name with the destination integration's logo at the top, this indicates the name of the field on My CRM Example.
Underneath there's a box where you may add the information you'd like to send.
- Check each of the My CRM Example fields available
- Match the information you wish to pass along from Facebook Lead Ads
- You may type the information manually and pass them as a static value
- Use the functions to customize information like reformatting dates and times or modifying text, phone numbers and so on
- You may also leave blank the box of a field's information you don't want to send through
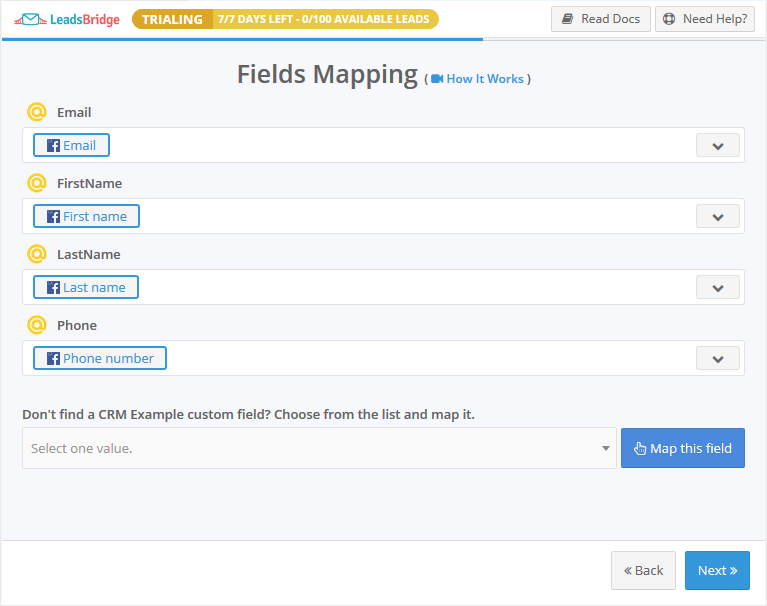
Custom Fields
- If you'd like to add more fields, just look at the bottom of the page
- Head over the "Don't find a CRM custom field?" box
- Select the field you'd like to add from the dropdown list
- Click the Add Custom Field button

- The field will appear above
- Add the desired information, as you did with the other ones
Once accomplished your desired outcome, just click Next and head to the last step.
Step 5: Test
- Fill in the required information when prompted
- Click Test
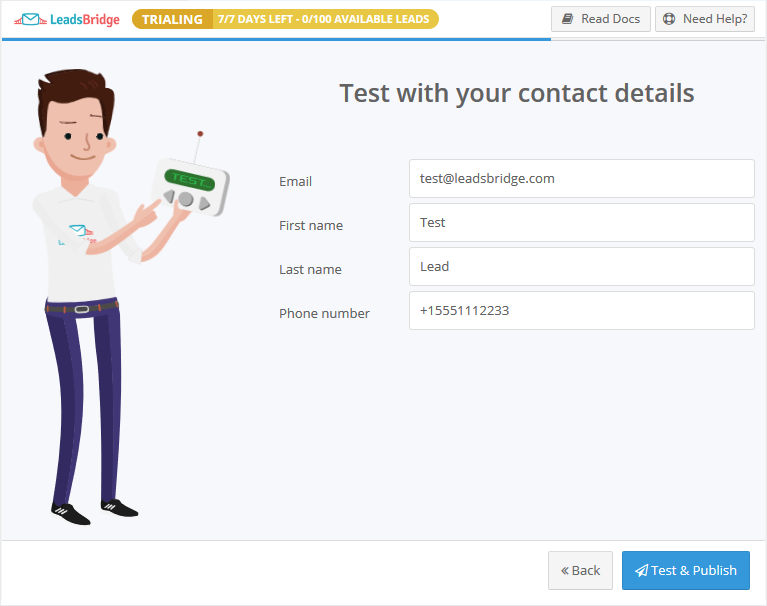
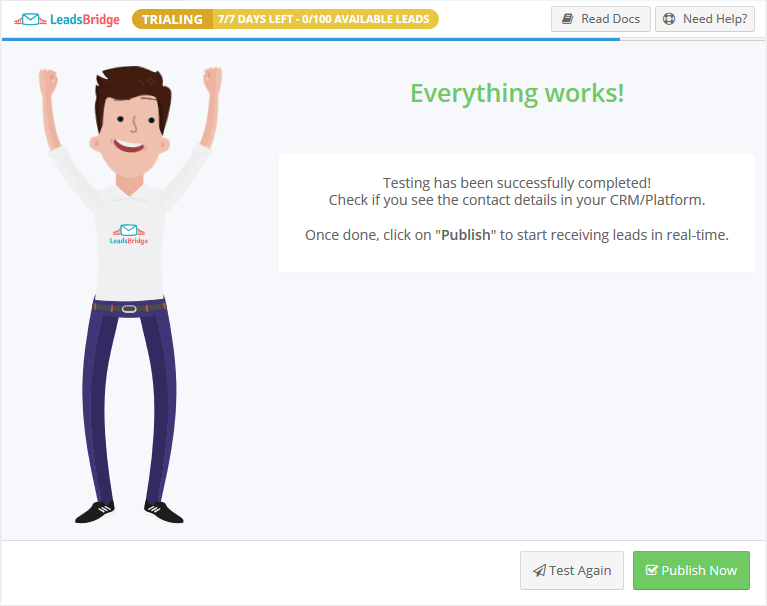
- If your test has been sent successfully, you'll see a success message
- Please check if you received the lead as expected
- You may send a new test lead by clicking on Test Again. You may then go back and change the Fields Mapping information or the integration details
- Click Publish to save your settings and activate the bridge
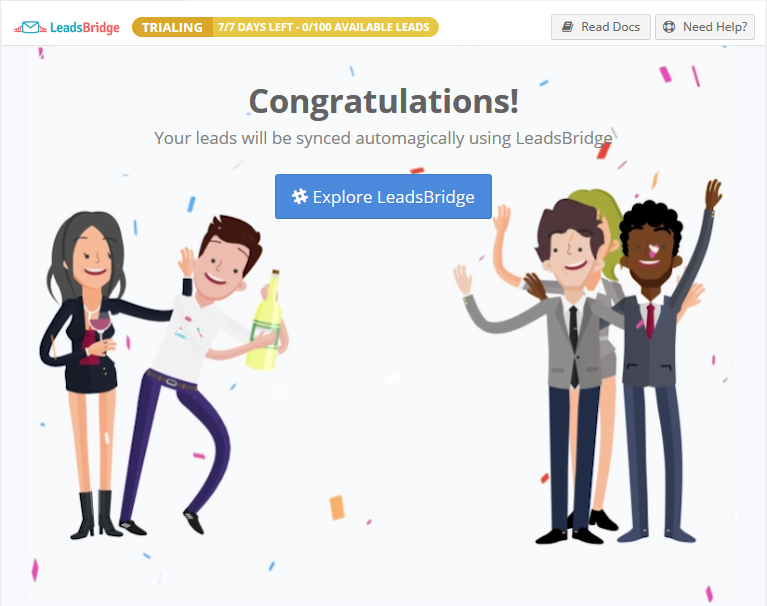
That's all! Congratulations.
If you created a new account, you may like to see the benefits that will come along: complete the account information and fully take advantage of it.
Click Complete your profile to open the LeadsBridge App!
Frequently Asked Questions
How can I connect another Lead Ads Form to the same Facebook Page?
This is how your Facebook Page connection should look like if you already set up a Lead Ads Form with the Leads Setup feature. If you'd like to connect another Lead Ads Form, please:
- Log in on your LeadsBridge account and open the Bridges section.
- Click on Add New to create a new bridge.
- Choose Facebook Lead Ads as the source for your bridge.
- Choose the CRM/platform you'd like to connect as the destination.
- Follow the wizard to set up the Lead Ads connection.
 You may follow our step-by-step example while configuring the bridge or click the Read Documentation button inside the bridge set up.
How can I remove the connection to the Facebook Page?
To remove the connection between your Facebook Page and LeadsBridge, you should:- Open the LeadsBridge app on the Bridges section.
- Select all the bridges connected to the Facebook Page (Test page my on the example below).
- Click on Delete and confirm to cancel them.

How do I remove the LeadsBridge app from my Facebook account?
If you’d like to disconnect LeadsBridge from your Facebook account, please:- Open your account settings and head over the Business Integrations section.
- Select the LeadsBridge app from the Active Business Integrations tab.
- Click the Remove button.
- Confirm to remove the connection.

 Please remember that all active bridges you may have on your LeadsBridge account, connected with your Facebook account, will be disconnected and will no longer sync leads.
If you'd like to reconnect them, please open the LeadsBridge app and reauthorize your Facebook account.
Please remember that all active bridges you may have on your LeadsBridge account, connected with your Facebook account, will be disconnected and will no longer sync leads.
If you'd like to reconnect them, please open the LeadsBridge app and reauthorize your Facebook account.
How can I reauthorize my Facebook Ad Account?
Sometimes it could happen that the Facebook Ad Account that you've connected has expired or some information has been changed on the Facebook side, in those cases you should reauthorize your account in order to refresh Facebook account connection with LeadsBridge. In order to reauthorize your Facebook Ad Account you should follow the steps below:- Login to the Facebook account you've connected with LeadsBridge
- Then, login to your LeadsBridge account
- On the left column, go to Facebook Suite » Ad Accounts
- Click on the name of the Facebook account you want to re-authorize (it should be the same you've logged on the first step)
- Click on the Reauthorize button, as shown in the screenshot below:

- A new Facebook page will open, follow the instruction and give all the required permissions
- Once done, you'll be redirected back into LeadsBridge
How can I identify the Source as Facebook or Instagram?
To identify the platform from which your lead is coming from you can match the Facebook field called Platform inside your desired destination field during the Fields Matching step of your bridge. For example, in the image below the user will receive the lead's Platform information inside his CRM's provider name field:
Why do I receive the Campaign ID instead of the Campaign Name?
If you receive the Campaign ID instead of the Campaign Name is because the Ad Form connected to the bridge is associated to a Campaign owned by another Ad Account and not by the one connected to the bridge. This happens because the Campaign is associated with a single Ad Account, while the Ad Form could be visible from different Ad Accounts because the Ad Form is related to a Facebook Page. In this case, the best practice is to use a single Ad Account for a Campaign and Ad Form.
Next steps
If after reading this document you are not entirely confident with the LeadsBridge solution, feel free to book a call or a platform live demo with us here.
For any other questions or concerns, please contact us here.
We look forward to automating your marketing and sales flows!