Connect Picatic to Velocify Direct Mail Warehouse with LeadsBridge
 »
» 
In this article, you'll learn how to set up the bridge and connect Picatic to Velocify Direct Mail Warehouse using LeadsBridge.
How to set up your bridge step-by-step tutorial
Before you start
Step 1: Bridge's Main information
- Choose a name for your bridge (this will only be visible inside LeadsBridge)
- You may add labels to help you identify your bridge later
- Choose Picatic as the source for your bridge
- Choose Velocify Direct Mail Warehouse as the destination
- Click on the Next button
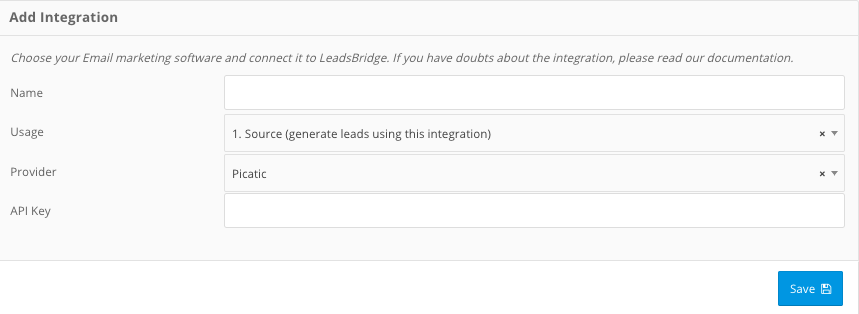
Step 2: Setup your Picatic source
- Type in the name you'd like to call your integration
- Enter API Key to connect your Picatic with LeadsBridge
![]()
- You will need to create a Picatic account (if you haven't already) and create an API key here: ( OPEN LINK)
- Click on the Next button
Step 3: Setup your Velocify Direct Mail Warehouse destination
- Type in the integration's name in the dedicated field
- Enter Username and Password to connect Velocify Direct Mail Warehouse with LeadsBridge
- Click on the Next button
- You'll now be able to select the destination segment to send your leads to
- You may choose to receive an email receipt for each incoming lead.
![]()
- Type the address(es) where you'd like to receive the receipt
- You may also modify the Subject line of the email
- Click on the Next button
Step 4: Fields Mapping
Here you'll be able to map your source information with your destination fields.
You'll see a field name with the destination integration's logo at the top, this indicates the name of the field on Velocify Direct Mail Warehouse.
Underneath there's a box where you may add the information you'd like to send.
- Check each of the Velocify Direct Mail Warehouse fields available
- Match the information you wish to pass along from Picatic
- You may type the information manually and pass them as a static value
- Use the functions to customize information like reformatting dates and times or modifying text, phone numbers and so on
- You may also leave blank the box of a field's information you don't want to send through
Custom Fields
- If you'd like to add more fields, just look at the bottom of the page
- Head over the "Don't find a CRM custom field?" box
- Select the field you'd like to add from the dropdown list
- Click the Add Custom Field button
![]()
- The field will appear above
- Add the desired information, as you did with the other ones
Once accomplished your desired outcome, just click Next and head to the last step.
Step 5: Test
In this final step, you'll be able to send a lead from LeadsBridge to test if the configuration works properly.
- To create a new test lead, fill in the required information when prompted
- Click Test Now
- To test with a real lead, switch the toogle to "Test with existing lead".
- Click Sync Now along the lead you'd like to send
- If you did everything right the button will turn green, meaning your lead was synced successfully and the integration is ready
- Click Finish to save your settings and turn active your bridge
That's all! Congratulations.
You'll be redirected to the bridges section of your account with a green success message at the top right of the page and your bridge will now be active.
Have you got some questions?
You may want to take a look at the common questions on the respective integration's documentation.
- Source: Picatic
- Destination: Velocify Direct Mail Warehouse
If you have any other questions, or need help to configure your bridge from Picatic to Velocify Direct Mail Warehouse with LeadsBridge, do not hesitate to contact our Support!


