Integrate Acuity Scheduling with LeadsBridge
Intro
Acuity Scheduling is easy-to-use and user-friendly scheduling solution using which clients can quickly view real-time availability, and book their appointments accordingly. This saves businesses from most of the headaches and mix-ups related to manual scheduling.
In this article, you'll learn how to connect your LeadsBridge account with Acuity Scheduling.
Connect Acuity Scheduling integration
Before you start
- Head over to the left sidebar and click on the Create new Bridge button
- Select your integrations in the selectors
- Click on the Continue button at the bottom right
Authorize Acuity Scheduling integration
Setup your Acuity Scheduling integration
- Click on Connect Acuity Scheduling
- Click on Create new integration to connect your Acuity Scheduling (or select an existing one from the dropdown if you already connected it)
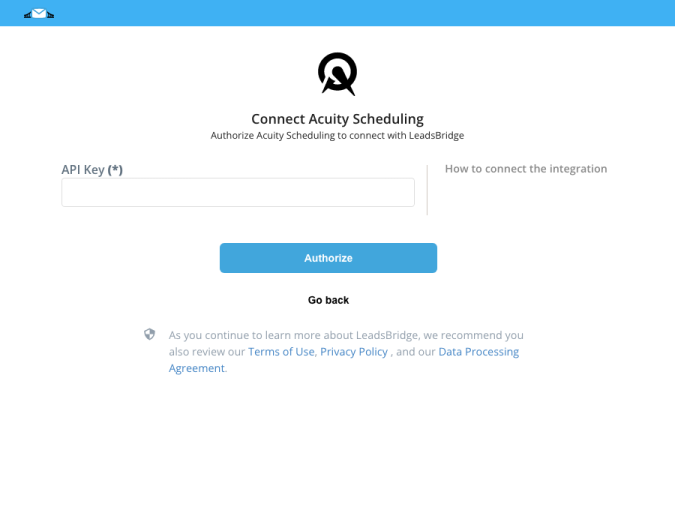
- A popup wil be opened where you can authorize the Acuity Scheduling integration
- Fill API Key field to connect Acuity Scheduling with LeadsBridge
- Click on the Authorize button
- You can choose a name for this Acuity Scheduling and LeadsBridge integration (you can also edit it later)
- Once done, click on Continue button and you will get back to the bridge experience where you could choose additional integration settings
- Now that your Acuity Scheduling is connected, you can continue with the set-up of your bridge
Configuration details for Acuity Scheduling
Other Info
1. Find your API credentials in Acuity Scheduling left menu, under Business Settings → Integrations, or by clicking here
2. Then Copy and Paste your credentials on LeadsBridge Integration's page
2. Then Copy and Paste your credentials on LeadsBridge Integration's page
Which entity concepts we support for Acuity Scheduling
With LeadsBridge you may use these entity concepts for Acuity Scheduling.
Contact
A person, or company, that has reached out to you in some way leaving their information so you can get in touch.
Which segmentation concepts we support for Acuity Scheduling
With LeadsBridge you may use these segmentation concepts for Acuity Scheduling.
Event
An event is an occurrence happening at a determinable time and place and can be described as a public assembly for the purpose of celebration, education, marketing or reunion.
Do you need help?
Here some additional resources:
- LeadsBridge KNOWLEDGE BASE
- Contact support from your account clicking on the top right Support button