Integrate Email Grabber with LeadsBridge
Intro
Email Grabber is an email extractor, a type of software used for extracting email addresses from both online and offline sources.
In this article, you'll learn how to connect your LeadsBridge account with Email Grabber.
Connect Email Grabber integration
Before you start
- Head over to the left sidebar and click on the Create new Bridge button
- Select your integrations in the selectors
- Click on the Continue button at the bottom right
Authorize Email Grabber integration
Setup your Email Grabber integration
- Click on Connect Email Grabber
- Click on Create new integration to connect your Email Grabber (or select an existing one from the dropdown if you already connected it)
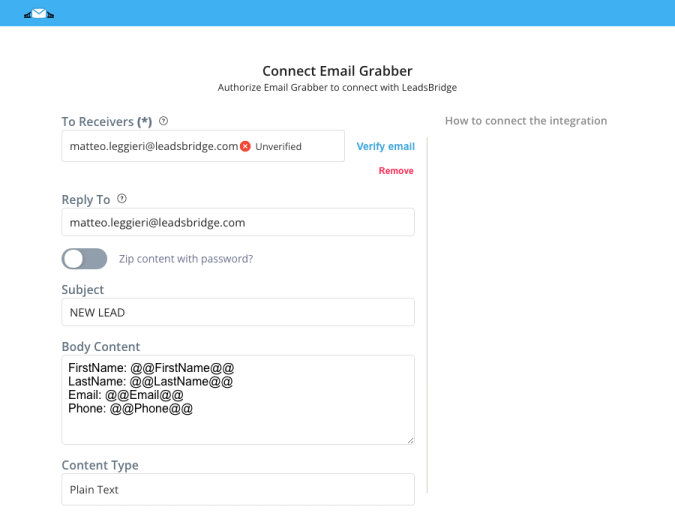
- A popup wil be opened where you can authorize the Email Grabber integration
- Fill Sender Email, To Receivers, Subject field to connect Email Grabber with LeadsBridge
- Click on the Authorize button
- You can choose a name for this Email Grabber and LeadsBridge integration (you can also edit it later)
- Once done, click on Continue button and you will get back to the bridge experience where you could choose additional integration settings
- Now that your Email Grabber is connected, you can continue with the set-up of your bridge
Configuration details for Email Grabber
How to get Sender Email, To Receivers, Subject
The Email Grabber allows you to customize the email template and it's generally used for systems that require specifics email format to process leads correctly.
A default "Body Content" sample will be provided, but you may customize it later in both format and fields.
- From: enter the sender's email address.
- To Receivers: one or more email addresses where you need to send the email to.
- Subject: the subject of the email.
A default "Body Content" sample will be provided, but you may customize it later in both format and fields.
Which entity concepts we support for Email Grabber
With LeadsBridge you may use these entity concepts for Email Grabber.
Lead
Leads are parties who are interested in your offering.
Common questions for Email Grabber
How do I add more leads information to the email template such as custom questions or ads tracking?
The email template can be styled as needed, however, to add more leads information you'll be required to add variables that are used to store this information to the template. A variable is a “named storage” for data.
To create a variable, we need to use the @@ keyword.
The statement below creates a variable with the name “CustomField”: [code]@@CustomField@@[/code] Now you can put some data into it by heading to the Fields Matching step of the bridge.
For instance, the variable CustomField can be imagined as a box labeled "CustomField" with the desired value in it.
It can be used to add ads tracking info such as campaign/adset/ad names or ids as well.

What does the “Zip Content with Password” option means?
"Zip content with Password" is a feature that secure the email content in a zip file protected with a password. You may set the password once you activate the zip option.

Can I add lead's information to the e-mail subject?
Yes, you may add lead's information to the email subject by adding a simple shortcode as you can see on the example below.
Add any source field's ID between the @@ keyword, following the @@field_id@@ syntax.
[code]@@full_name@@ to add the lead's full name
@@first_name@@ to add the lead's first name
@@last_name@@ to add the lead's last name
@@email@@ if you'd like to add the lead's email[/code]
Lead Distribution how-to: Send the email to different addresses based on a field value
To send email to different receivers based on a field's value, please follow the steps outlined here.
1. First and foremost, please remove any email address from the integration's To Receivers field and leave it blank. This is a necessary step in order to achieve the lead distribution goal.
![]() 2. Once done, open the bridge settings and head to the Fields Matching step.
3. Locate the TO Receivers field from the Custom Fields drop-down, then add it.
2. Once done, open the bridge settings and head to the Fields Matching step.
3. Locate the TO Receivers field from the Custom Fields drop-down, then add it.
![]() 3. Open the Functions tab.
4. Click on UTILS » TRANSLATE VALUE function from the list.
5. Inside the Field drop-down select the field representing the key value useful for the matching.
6. Then in the Map area enter the pattern following the input;output; syntax, for example: [code]yes;paul@email.com;no;john@domain.com;[/code]If you want the output value to be empty, you should type the word EMPTY in capital letters; for example: [code]pattern1;EMPTY;[/code]
7. Click on Confirm once accomplished the desired outcome.
8. Head to the Test step to check if everything is working as expected, then click on Publish to save your settings and activate the bridge.
For instance, following the example above will send the email to paul@email.com when the source field selected is "yes", or to john@domain.com when the field's value is "no".
3. Open the Functions tab.
4. Click on UTILS » TRANSLATE VALUE function from the list.
5. Inside the Field drop-down select the field representing the key value useful for the matching.
6. Then in the Map area enter the pattern following the input;output; syntax, for example: [code]yes;paul@email.com;no;john@domain.com;[/code]If you want the output value to be empty, you should type the word EMPTY in capital letters; for example: [code]pattern1;EMPTY;[/code]
7. Click on Confirm once accomplished the desired outcome.
8. Head to the Test step to check if everything is working as expected, then click on Publish to save your settings and activate the bridge.
For instance, following the example above will send the email to paul@email.com when the source field selected is "yes", or to john@domain.com when the field's value is "no".
 2. Once done, open the bridge settings and head to the Fields Matching step.
3. Locate the TO Receivers field from the Custom Fields drop-down, then add it.
2. Once done, open the bridge settings and head to the Fields Matching step.
3. Locate the TO Receivers field from the Custom Fields drop-down, then add it.
 3. Open the Functions tab.
4. Click on UTILS » TRANSLATE VALUE function from the list.
5. Inside the Field drop-down select the field representing the key value useful for the matching.
6. Then in the Map area enter the pattern following the input;output; syntax, for example: [code]yes;paul@email.com;no;john@domain.com;[/code]If you want the output value to be empty, you should type the word EMPTY in capital letters; for example: [code]pattern1;EMPTY;[/code]
7. Click on Confirm once accomplished the desired outcome.
8. Head to the Test step to check if everything is working as expected, then click on Publish to save your settings and activate the bridge.
For instance, following the example above will send the email to paul@email.com when the source field selected is "yes", or to john@domain.com when the field's value is "no".
3. Open the Functions tab.
4. Click on UTILS » TRANSLATE VALUE function from the list.
5. Inside the Field drop-down select the field representing the key value useful for the matching.
6. Then in the Map area enter the pattern following the input;output; syntax, for example: [code]yes;paul@email.com;no;john@domain.com;[/code]If you want the output value to be empty, you should type the word EMPTY in capital letters; for example: [code]pattern1;EMPTY;[/code]
7. Click on Confirm once accomplished the desired outcome.
8. Head to the Test step to check if everything is working as expected, then click on Publish to save your settings and activate the bridge.
For instance, following the example above will send the email to paul@email.com when the source field selected is "yes", or to john@domain.com when the field's value is "no".

Does the Mail integration support UTF-8 characters?
Actually our integration does not support e-mail addresses containing UTF-8 characters (for example: ü, ä, ö and so on).
If you write an UTF-8 address into the "Email" field, the email will be sent correctly but the "Reply-To" field will not be filled.
Do you need help?
Here some additional resources:
- LeadsBridge KNOWLEDGE BASE
- Contact support from your account clicking on the top right Support button