Connect Google BigQuery to Email Notification with LeadsBridge
In this article, you'll learn how to set up the bridge and connect Google BigQuery to Email Notification using LeadsBridge.
How to set up your bridge step-by-step tutorial
Before you start
Step 1: Bridge's Main information
- Choose a name for your bridge (this will only be visible inside LeadsBridge)
- You may add labels to help you identify your bridge later
- Choose Google BigQuery as the source for your bridge
- Choose Email Notification as the destination
- Click on the Next button
Step 2: Setup your Google BigQuery source
- Type in the name you'd like to call your integration
- Enter GCP Authentication JSON and Dataset name to connect your Google BigQuery with LeadsBridge
![]()
- To authenticate in Google BigQuery you need to have the OAuth JSON file for your project with the right roles set. If you don't have this file yet, please follow the official guide below to generate it.
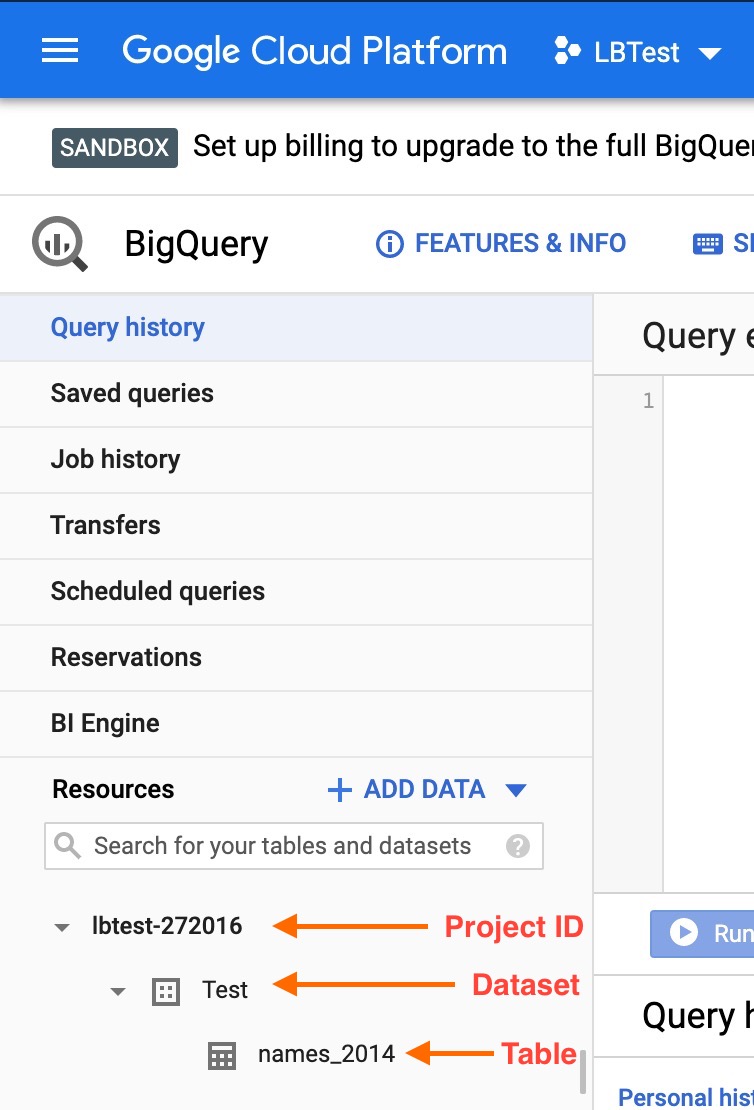
Once downloaded, open the file, select the whole content and paste it into the "GCP Authentication JSON" field.( OPEN LINK) - All the needed data can be found on your Google BigQuery dashboard on the left as shown in the picture below.
In the "Dataset name" field you have to specify the name of the database you want to use in Google BigQuery.
In the "Project ID" field you have to specify your Google Cloud Platform project id.
As entity Google BigQuery uses the single record of your database, so select "Record" from the "Manage "Entities as" dropdown.
As segmentation, you will have to select the database table to use, so select "Table" from the "Use Segment as" dropdown.![]()
- Select the segment you'd like to use as the source for your leads
- Click on the Next button

Step 3: Setup your Email Notification destination
- Type in the integration's name in the dedicated field
- Enter To Receivers where you want to send your leads
![]()
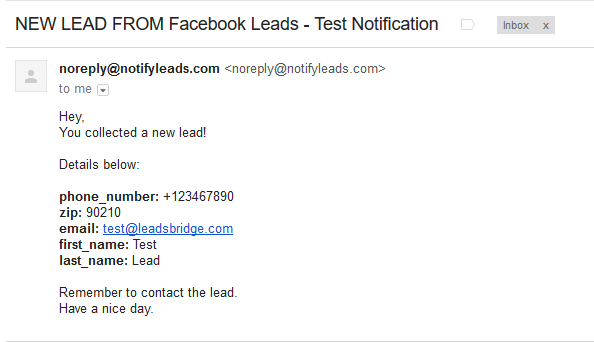
- This is a preview of the Email Notification message that will reach your inbox once the bridge is set up.
![]()
- Click on the Next button
- You'll now be able to select the destination segment to send your leads to
- Click on the Next button

Step 4: Fields Mapping
Everything is already set up! No additional configuration is required for this Email Notification integration.
- Let's head to the last step
- Click on the Next button
Step 5: Test
In this final step, you'll be able to send a lead from LeadsBridge to test if the configuration works properly.
- To create a new test lead, fill in the required information when prompted
- Click Test Now
- To test with a real lead, switch the toogle to "Test with existing lead".
- Click Sync Now along the lead you'd like to send
- If you did everything right the button will turn green, meaning your lead was synced successfully and the integration is ready
- Click Finish to save your settings and turn active your bridge
That's all! Congratulations.
You'll be redirected to the bridges section of your account with a green success message at the top right of the page and your bridge will now be active.
Have you got some questions?
You may want to take a look at the common questions on the respective integration's documentation.
- Source: Google BigQuery
- Destination: Email Notification
If you have any other questions, or need help to configure your bridge from Google BigQuery to Email Notification with LeadsBridge, do not hesitate to contact our Support!