Integrate PostUp with LeadsBridge
Intro
PostUp is an Email Service Provider with Omni-Channel capabilities. They’re the industry leader in email marketing and provide an award-winning marketing platform. We are proud that LeadsBridge is a PostUp partnership and part of the official Partner Program. With LeadsBridge and PostUp, you can bridge the gap between Facebook Ads and your marketing and email activities. The integration is free for customers of both LeadsBridge and PostUp platform.
In this article, you'll learn how to connect your LeadsBridge account with PostUp.
Connect PostUp integration
Before you start
- Head over to the left sidebar and click on the Create new Bridge button
- Select your integrations in the selectors
- Click on the Continue button at the bottom right
Authorize PostUp integration
Setup your PostUp integration
- Click on Connect PostUp
- Click on Create new integration to connect your PostUp (or select an existing one from the dropdown if you already connected it)
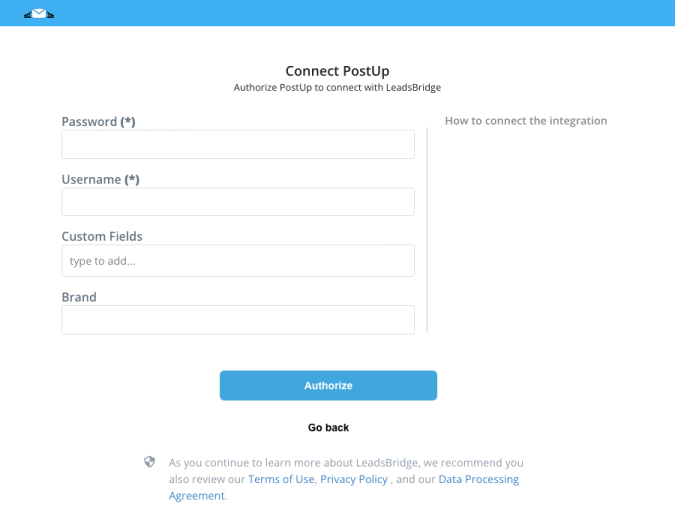
- A popup wil be opened where you can authorize the PostUp integration
- Fill Username, Password field to connect PostUp with LeadsBridge
- Click on the Authorize button
- You can choose a name for this PostUp and LeadsBridge integration (you can also edit it later)
- Once done, click on Continue button and you will get back to the bridge experience where you could choose additional integration settings
- Now that your PostUp is connected, you can continue with the set-up of your bridge
Configuration details for PostUp
How to get Username, Password
The Username and Password are the same that are used to log into your PostUp account.
Which entity concepts we support for PostUp
With LeadsBridge you may use these entity concepts for PostUp.
Recipient
A recipient is used for mailing previews. Users can then see how dynamic content or personalization tags will appear for that recipient.
Which segmentation concepts we support for PostUp
With LeadsBridge you may use these segmentation concepts for PostUp.
Group
A group influences how consumers interpret information and make purchasing decisions. Reference groups influence what types of products you will purchase and which brand of product you choose.List
A list is a number of connected items or names written or printed consecutively, typically one below the other.Import Template
PostUp clients use import and send templates to manage recipient information and messaging. These templates allow clients to:- Configure all options for automatically importing recipient data and the Event Triggered Messages
- Reference specific templates when using an API call or watch directory
- Field mapping and delimiter
- Subscriptions to list(s)
- Duplicate record handling
Common questions for PostUp
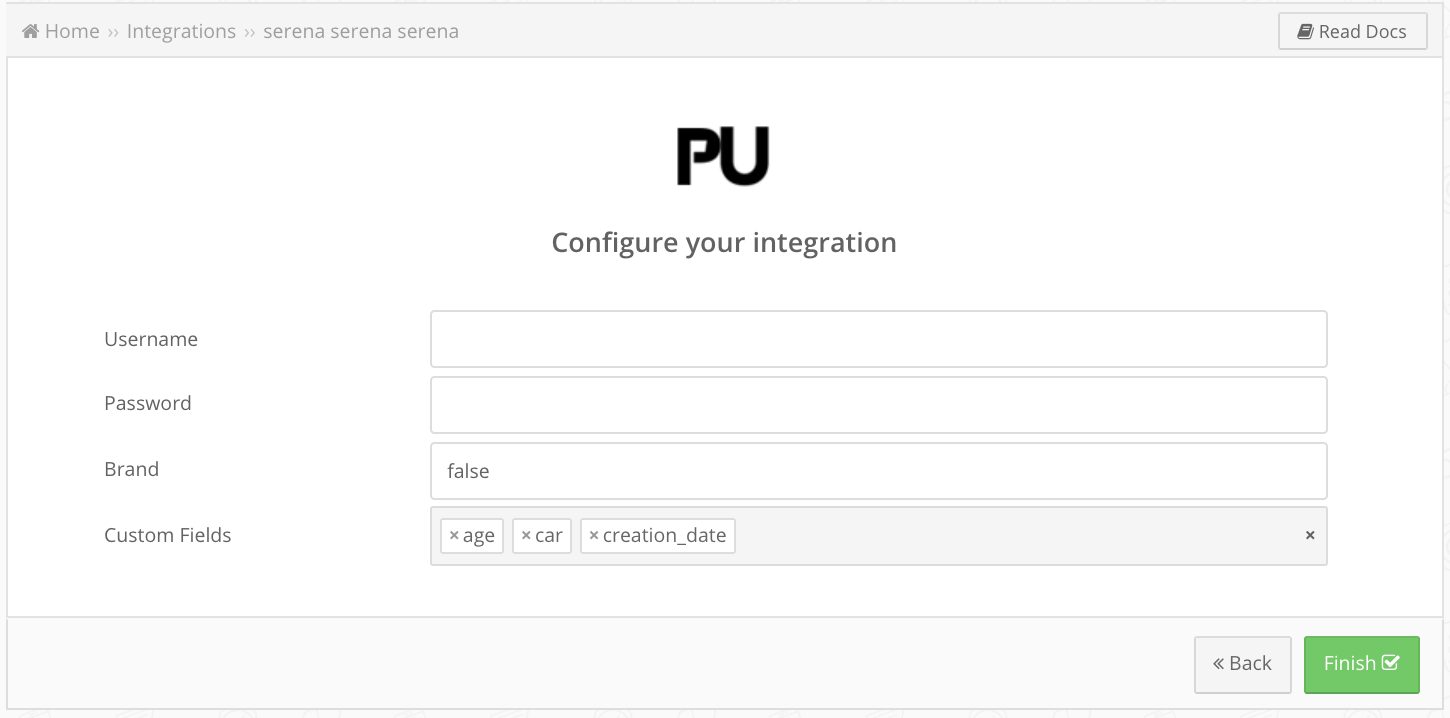
How do I add custom fields?
If you are looking to sync more information with PostUp, you can use custom fields.
Please make sure they are already created inside your PostUp account.
Once done, you should add the relative custom fields name in the integration, where you see the Custom Fields option, as you can see in the screenshot below.
For our example, we used age, car and creation_date as custom fields.
How can I use my import templates?
To use your import templates and send data through them, follow these few steps:
1. enter the segmentation selection phase for the destination
2. Now you should see, among the possible segmentations, some segments with IMPORT LIST in front of your name
3. select your desired IMPORT LIST and click on NEXT
4. in the field matching phase you will then see new custom fields that reflect the various fields you set in the import template
Do you need help?
Here some additional resources:
- LeadsBridge KNOWLEDGE BASE
- Contact support from your account clicking on the top right Support button