Connect NetSuite to Facebook Conversions API with LeadsBridge
In this article, you'll learn how to set up the bridge and connect NetSuite to My CRM Example using LeadsBridge.
How to set up your bridge step-by-step tutorial
Before you start
- Head over to the left sidebar and click on the Create new Bridge green button
- You'll be taken to the first step of the bridge creation
Step 1: Choose the apps you want to connect
- Choose NetSuite as the source for your bridge
- Choose Facebook Conversions API as the destination for your bridge
- Click on the Continue button
- At this point you can choose a name for your bridge (this will only be visible inside LeadsBridge and you can also edit it later)
Step 2: Configure your NetSuite with Facebook Conversions API
Step 2.A: Setup your NetSuite integration
- Click on Connect NetSuite
- Click on Create new integration to connect your NetSuite (or select an existing one from the dropdown if you already connected it)
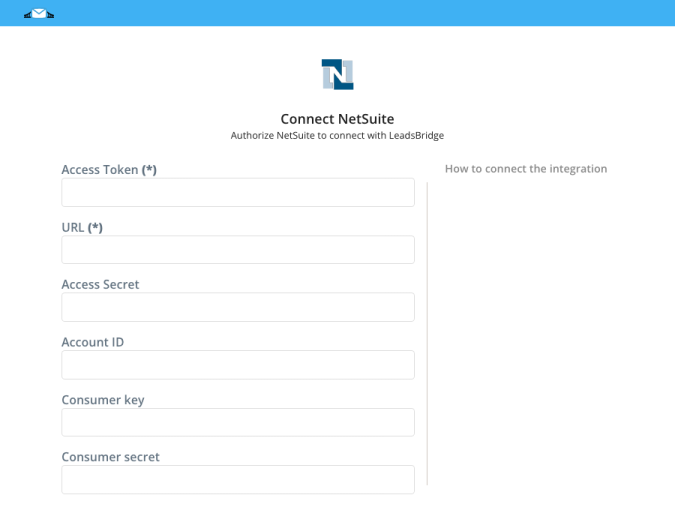
- A popup wil be opened where you can authorize the NetSuite integration
- Fill URL, Account ID, Consumer key, Consumer secret, Access Token, Access Secret field to connect NetSuite with LeadsBridge
- Click on the Authorize button
- You can choose a name for this NetSuite and LeadsBridge integration (you can also edit it later)
- Once done, click on Continue button and you will get back to the bridge experience where you could choose additional integration settings
- Now that your NetSuite is connected, you can continue with the set-up of your bridge
Step 2.B: Configuration details for NetSuite
How to get URL, Account ID, Consumer key, Consumer secret, Access Token, Access Secret
In order to get your URL and Account ID you should follow the steps below:
- Log into your NetSuite account as Administrator
- Go to Setup » Company » Company Information
![]()
- Your URL should look like one of the following cases:

- https://AccountID.suitetalk.api.netsuite.com
- https://AccountID.app.netsuite.com
- If those URL formats doesn't work, go back to the Company Information page and check the value of CUSTOMER CENTER LOGIN which contains the URL but use only the first part of it: https://XXX.netsuite.com where XXX depends on your account region.
After that, in order to get your Consumer Key and Consumer Secret, you should create an Integration inside NetSuite by follow the steps below:
- Log into your NetSuite account as Administrator
- Go to Setup » Integration » Manage Integrations » New
![]()
- Inside the Name field type a descriptive name, for example LeadsBridge Integration
- Keep State as Enabled
- Check the Token-Based Authentication checkbox in the Authentication section
- Then click on Save
- After that, Consumer Key and Consumer Secret will be displayed, copy them.
- Go back into your LeadsBridge Integration and paste your Consumer Key and Consumer Secret in their corresponding fields

To be able to create an Access Token you should enable your NetSuite account with Token-Based Authentication by following the steps below:
- Log into your NetSuite account as Administrator
- Go to Setup » Company » Enable Features
- Click on SuiteCloud sub tab
- Scroll down to Manage Authentication section
- Check the TOKEN-BASED AUTHENTICATION checkbox
- Save your changes
After this you should assign a role to the user’s account you are using inside LeadsBridge by following the steps below:
- Log into your NetSuite account as Administrator
- Go to Setup » Users/Roles » Manage Users
- Under the Name column click on the user’s name you want to give access
- Then click on Edit button under the user’s name
- Go into the Access sub-tab at the bottom
- Then click on the Add dropdown button under Roles, we recommend selecting Full Access or other similar roles
- Click again on Add to assign the role to the user
- After that, click on Save
Now we should create the Token for this user by following the steps below:
- Go to Setup » Users/Roles » Access Tokens » New
![]()
- Select an Application Name
- Under User select the user you assigned the Role in the step before
- Inside Role select the one you gave to the user in the step before, for example Full Access
- Under Token Name you can give a descriptive name to the Token you are creating
- Then click on Save button
![]()
- Now you should be able to see your Token ID and Token Secret
- Copy your NetSuite Token ID and paste it inside LeadsBridge Access Token field
- Finally, copy your NetSuite Token Secret and paste it inside LeadsBridge Access Secret field


Step 2.C: Setup your Facebook Conversions API integration
- Click on Create new integration to connect your Ad account (or select an existing one from the dropdown if you already connected it)
- You will be prompted to the Ad platform authorization experience. Here you will need to grant LeadsBridge access on click on the Authorize button
- Once done, you can choose a name for this Facebook Conversions API and LeadsBridge integration (you can also edit it later)
- Once the authorization pop up is closed, you are ready to select from the dropdown the Ad Account and all the required parameters, including the sync frequencies.
- Use Simulation functionality in order to test the source data and receive a report to verify the information processed
- Now that your Facebook Conversions API integration is fully set up too, you can click on the Continue button
Notes for the simulation mode: A published bridge with simulation ON is not sending any data, the simulation has to be switched off to have the audience being created, up and running on the Advertising platform. You can edit it later from inside the bridge if you want to go live and send the data.
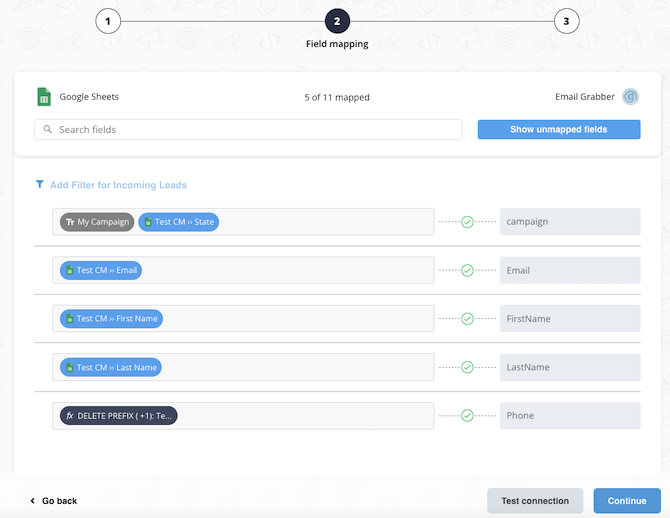
Step 3: Fields Mapping
Here you'll be able to map your NetSuite information with your Facebook Conversions API fields.
- You will have Facebook Conversions API fields on the left. Match the information you wish to pass align from NetSuite
- Based on Facebook Conversions API functionality, some fields might be required; if this is the case, you can identify those fields with a * (star), so be sure to map all them
- You can also use the functions to customize information like reformatting dates and times or modifying text, phone numbers and so on.
- You may leave blank the box of a field's information you don't want to send through. Clicking on the Show unmapped fields button you will have visibility on all the available fields still not mapped
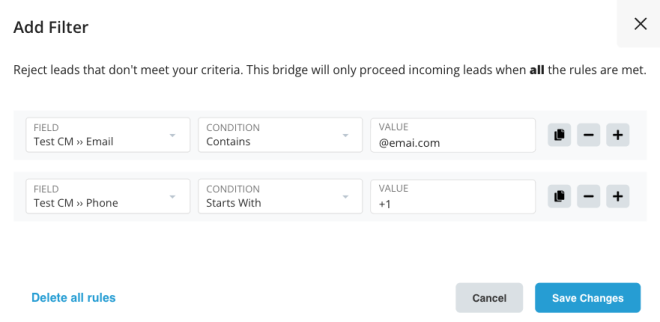
Step 3.A: Leads Filter (Optional)
If you'd like you could add a filter for incoming leads. This filter will sync only leads that meet the configured conditions
- Click on the link Add Filter for Incoming Leads on the top left
- A popup wil be opened where you can configure the filter
- You can define a series of condition to filter the leads. The lead will be synced only when all the conditions will be met
- Once finished, click the Save Changes button to switch back to the Fields Mapping to continue with the bridge configuration
Step 4: Save and Publish
- Click on the Save and publish button
Congratulations! Now your bridge is up and running
Common questions for Facebook Conversions API
How does Facebook Conversion API work?
Facebook Conversions API is Facebook’s new way of sending events (e.g. conversions) to the Facebook platform allowing the advertiser to specify which data to send and therefore have full control of the data sent to the Facebook platform. To understand how Facebook Conversions API works, here's a breakdown of the key steps:
- User enters the website: When a user visits your website, ensure that you have a Facebook Pixel in place. The Facebook Pixel stores essential user data in cookies.
- Server saves user information: Similar to saving IP addresses and other parameters, your server will securely store user data collected by the Facebook Pixel.
- Event triggering: When a user triggers an event, such as making a purchase or submitting a form, your server will send a request to the Facebook server. This request includes information about the event and the user data saved by your server.
To use Facebook Conversions API, you need to set up the following:
- Meta Business Manager: This is a mandatory requirement as it allows you to use Meta Conversions API effectively. Ensure that your Facebook Pixel is associated with the Business Manager.
- Facebook App: You need to set up a specialized Facebook App that works with Facebook Conversions API. This app is combined with your Business Manager for seamless integration.
Facebook Conversions API tracks various events, including:
- Leads
- Affiliate payments
- Find locations
- Phone calls
- Form submissions
- Purchases
- Email subscriptions
- Subscription changes
How to use Facebook Conversion API?
To use Facebook Conversion API effectively, companies should consider the following:
- By utilizing both the Conversions API and Pixel, advertisers can achieve optimal full-funnel tracking and reliable data sharing. This ensures more robust tracking capabilities and enhanced data insights to drive successful advertising campaigns.
- With the Conversions API, advertisers can capture additional data such as CRM data and lower funnel events. This allows for a more comprehensive understanding of customer behavior and enables better targeting and optimization strategies.
- While some companies have the option to develop the Conversions API technology in-house, it may not always be the optimal solution. With existing operational duties, using a trusted Facebook Marketing Partner (FMP) like LeadsBridge can provide a streamlined and efficient way to leverage the Conversions API without encountering the mentioned challenges.
Why use Facebook Conversion API?
Facebook Conversion API, provides several benefits for businesses looking to optimize their advertising on the platform. Here are some reasons why you should consider using CAPI:
- Accurate measurement of actions: With CAPI, you can precisely track and measure various events, including delayed values and user/lead scores. This allows you to gather valuable data for optimizing your campaigns with other Facebook tools.
- Improved targeting data accuracy: When paired with Facebook Pixel, CAPI enhances the accuracy of your targeting data. This means that you can better reach your desired audience and improve the overall effectiveness of your ads.
- Complete control over data sharing: CAPI gives you the power to decide what data to share and when to share it. You have full control over your business's marketing data, providing peace of mind and ensuring data privacy.
- Direct link between your data and Facebook: By using CAPI, you establish a reliable connection between your marketing data and Facebook. This connection enables seamless data collection from your website, apps, and offline conversions, allowing for personalized campaigns and better conversion rates.
- Comprehensive view of the customer journey: Combining the capabilities of CAPI and Pixel provides you with a holistic view of your customer's journey. You can track a higher number of conversions and gain deeper insights into the performance of your Facebook campaigns.
Do you need help?
Here some additional resources:
- NetSuite documentation page and common questions
- Facebook Conversions API documentation page and common questions
- LeadsBridge KNOWLEDGE BASE
- Contact support from your account clicking on the top right Support button