Connect TikTok Lead Generation to NetSuite with LeadsBridge
In this article, you'll learn how to set up the bridge and connect TikTok Lead Generation to My CRM Example using LeadsBridge.
How to set up your bridge step-by-step tutorial
Before you start
- Head over to the left sidebar and click on the Create new Bridge green button
- You'll be taken to the first step of the bridge creation
Step 1: Choose the apps you want to connect
- Choose TikTok Lead Generation as the source for your bridge
- Choose NetSuite as the destination for your bridge
- Click on the Continue button
- At this point you can choose a name for your bridge (this will only be visible inside LeadsBridge and you can also edit it later)
Step 2: Configure your TikTok Lead Generation with NetSuite
Step 2.A: Setup your TikTok Lead Generation integration
- Click on Connect TikTok Lead Generation
- Click on Create new integration to connect your Ad account (or select an existing one from the dropdown if you already connected it)
- You will be prompted to the Ad platform authorization experience. Here you will need to grant LeadsBridge access on click on the Authorize button
- Once done, you can choose a name for this TikTok Lead Generation and LeadsBridge integration (you can also edit it later)
- Once the authorization pop up is closed, you are ready to select from the dropdown the Ad Account and all the required parameters, including the form used to generate the leads.
- Now that your TikTok Lead Generation is connected, you can set-up your bridge destination
Step 2.B: Setup your NetSuite integration
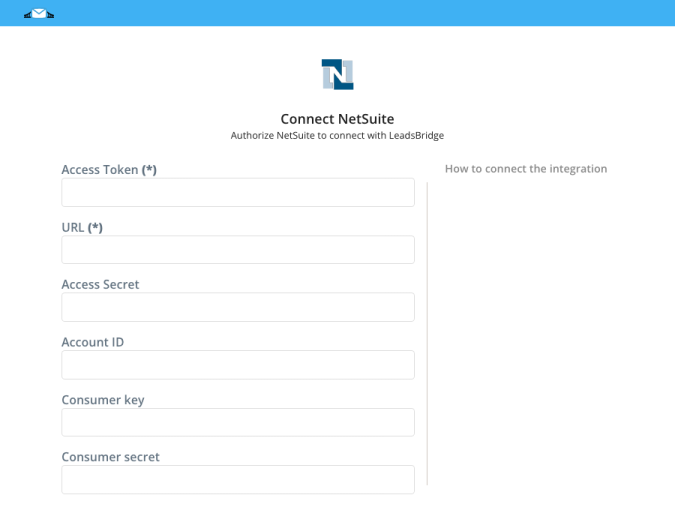
- Click on Connect NetSuite
- Click on Create new integration to connect your NetSuite (or select an existing one from the dropdown if you already connected it)
- A popup wil be opened where you can authorize the NetSuite integration
- Fill URL, Account ID, Consumer key, Consumer secret, Access Token, Access Secret field to connect NetSuite with LeadsBridge
- Click on the Authorize button
- You can choose a name for this NetSuite and LeadsBridge integration (you can also edit it later)
- Once done, click on Continue button and you will get back to the bridge experience where you could choose additional integration settings
- Now that your NetSuite is connected, you can continue with the set-up of your bridge
Step 2.C: Configuration details for NetSuite
How to get URL, Account ID, Consumer key, Consumer secret, Access Token, Access Secret
In order to get your URL and Account ID you should follow the steps below:
- Log into your NetSuite account as Administrator
- Go to Setup » Company » Company Information
![]()
- Your URL should look like one of the following cases:

- https://AccountID.suitetalk.api.netsuite.com
- https://AccountID.app.netsuite.com
- If those URL formats doesn't work, go back to the Company Information page and check the value of CUSTOMER CENTER LOGIN which contains the URL but use only the first part of it: https://XXX.netsuite.com where XXX depends on your account region.
After that, in order to get your Consumer Key and Consumer Secret, you should create an Integration inside NetSuite by follow the steps below:
- Log into your NetSuite account as Administrator
- Go to Setup » Integration » Manage Integrations » New
![]()
- Inside the Name field type a descriptive name, for example LeadsBridge Integration
- Keep State as Enabled
- Check the Token-Based Authentication checkbox in the Authentication section
- Then click on Save
- After that, Consumer Key and Consumer Secret will be displayed, copy them.
- Go back into your LeadsBridge Integration and paste your Consumer Key and Consumer Secret in their corresponding fields

To be able to create an Access Token you should enable your NetSuite account with Token-Based Authentication by following the steps below:
- Log into your NetSuite account as Administrator
- Go to Setup » Company » Enable Features
- Click on SuiteCloud sub tab
- Scroll down to Manage Authentication section
- Check the TOKEN-BASED AUTHENTICATION checkbox
- Save your changes
After this you should assign a role to the user’s account you are using inside LeadsBridge by following the steps below:
- Log into your NetSuite account as Administrator
- Go to Setup » Users/Roles » Manage Users
- Under the Name column click on the user’s name you want to give access
- Then click on Edit button under the user’s name
- Go into the Access sub-tab at the bottom
- Then click on the Add dropdown button under Roles, we recommend selecting Full Access or other similar roles
- Click again on Add to assign the role to the user
- After that, click on Save
Now we should create the Token for this user by following the steps below:
- Go to Setup » Users/Roles » Access Tokens » New
![]()
- Select an Application Name
- Under User select the user you assigned the Role in the step before
- Inside Role select the one you gave to the user in the step before, for example Full Access
- Under Token Name you can give a descriptive name to the Token you are creating
- Then click on Save button
![]()
- Now you should be able to see your Token ID and Token Secret
- Copy your NetSuite Token ID and paste it inside LeadsBridge Access Token field
- Finally, copy your NetSuite Token Secret and paste it inside LeadsBridge Access Secret field


Step 2.D: Email Receipt (Optional)
You may choose to receive an email receipt for each incoming lead.
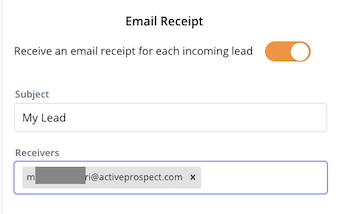
- Type the address(es) where you'd like to receive the receipt
- You may also modify the Subject line of the email
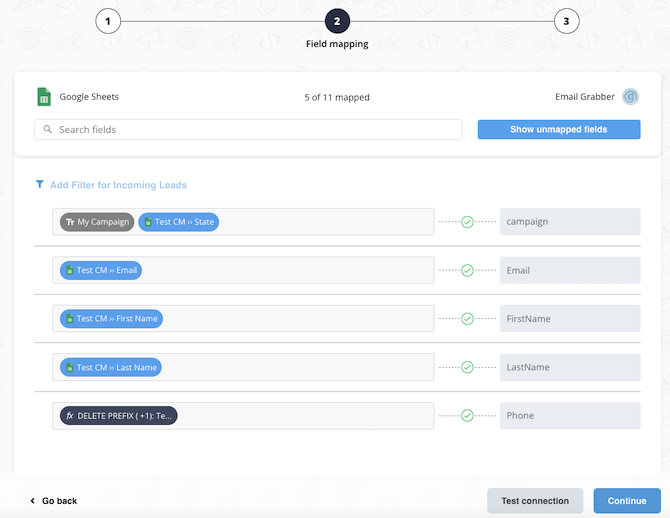
Step 3: Fields Mapping
Here you'll be able to map your TikTok Lead Generation information with your NetSuite fields.
- You will have NetSuite fields on the left. Match the information you wish to pass align from TikTok Lead Generation
- Based on NetSuite functionality, some fields might be required; if this is the case, you can identify those fields with a * (star), so be sure to map all them
- You can also use the functions to customize information like reformatting dates and times or modifying text, phone numbers and so on.
- You may leave blank the box of a field's information you don't want to send through. Clicking on the Show unmapped fields button you will have visibility on all the available fields still not mapped
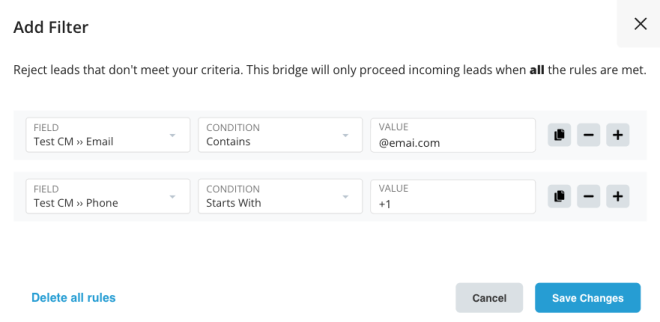
Step 3.A: Leads Filter (Optional)
If you'd like you could add a filter for incoming leads. This filter will sync only leads that meet the configured conditions
- Click on the link Add Filter for Incoming Leads on the top left
- A popup wil be opened where you can configure the filter
- You can define a series of condition to filter the leads. The lead will be synced only when all the conditions will be met
- Once finished, click the Save Changes button to switch back to the Fields Mapping to continue with the bridge configuration
Step 3.B Test Connection (Optional)
Once you’ve mapped all the fields that you need, if available, you can run a test of your connection by clicking on the Test Connection button.

Step 4: Save and Publish
- Click on the Save and publish button
Congratulations! Now your bridge is up and running
Common questions for TikTok Lead Generation
What is TikTok Lead Generation?
TikTok Lead Generation is an ad objective introduced by TikTok that provides marketers with a seamless and efficient way to interact with potential customers directly on the TikTok platform. Similar to Facebook Lead Ads, TikTok Lead Generation offers a mobile-optimized solution to capture leads and drive sales.
By incorporating an Instant Form within the TikTok app, users can learn about your brand and respond to your questions without being redirected to an external landing page.
This cost-effective alternative streamlines the process of sharing and gathering information, making it a valuable tool for generating leads.
With pre-populated fields and customizable forms, businesses can easily collect relevant data from their audience. Additionally, TikTok Lead Generation allows for immediate access to lead data, enabling prompt action and seamless integration with CRM systems through partnerships with platforms like LeadsBridge.
How to generate leads on TikTok?
Generating leads on TikTok can be done effectively through various strategies. Here are some key methods to consider:
- TikTok Lead Generation Ads: Utilize immersive, vertical, short-form videos to capture users' attention and encourage them to share their contact information directly on the TikTok platform. This eliminates the need for users to visit a separate landing page.
- Include Clickable Links in Your Bio: Optimize your bio by adding clickable links that can direct users to your website, invite them to events, or encourage them to subscribe to your email newsletters.
- Take Advantage of TikTok Challenges: Engage with both organic and sponsored TikTok challenges to increase brand awareness and reach a wider audience. Viral challenges can expose your brand to numerous potential customers.
- Partner with TikTok Influencers: Collaborating with TikTok influencers allows you to expand your reach and generate high-quality leads. Micro-influencers, in particular, can provide valuable exposure and engage with a targeted audience.
By implementing these strategies, you can effectively generate leads on TikTok and optimize your marketing efforts for a higher return on investment (ROI).
How to create a TikTok Lead Generation Campaign?
- Log in to your TikTok Ads Manager account.
- Go to the Campaign tab and click Create to start a new campaign.
- On the Campaign level, select "Lead Generation" as the advertising objective.
- Complete your campaign-level selections and click Continue.
- On the Ad Group level, define the following settings:
- The ads placement: set it to TikTok (as it currently supports the Lead Generation objective).
- Targeting: you will be unable to target audiences under 18 years old.
- Bidding & Optimization: the Optimization Goal will be set to leads, the Bid Strategy will be Cost Cap, the bid will be Cost per Lead, and the Billing Event will be optimized Cost per Mille (oCPM). - On the Ad level, create an Ad group with a single video and provide the necessary Ad details.
- Under the Instant Form module, select or create an Instant Form to link with your Ad's Call to Action.
- Optionally, add any third-party tracking links.
- Once everything is set, click Submit to publish your Ad and Form.
Note: The instructions provided are for informational purposes only and may be subject to change as TikTok updates its platform.
An error says that I am not an Admin of the TikTok Ad Account while configuring the bridge.
This means that you have connected a user that has access to the Ad Account through the TikTok Business Center and it is not Admin of the Ad Account.
To request access to the Ad Account :
Go to Advertiser accounts, and click Add Advertiser Account
Select Request Access, and click Next
Paste in the Account ID and select the Admin Access Permission you want to request. You can also choose to send an email notification to the Ad Account owner asking for approval.
After sending the request:
If the Ad Account is created by a Business Center, please ask one of the Ad Account admins to accept the request in TikTok Ads Manager
If the Ad Account is created by an individual user and does not belong to any Business Center, please ask the ad account creator to accept the request in TikTok Ads Manager.
The request can be found in TikTok Ads Manager Notification, under Business Center.
Why my TikTok account and Form aren’t not showing up while building the Bridge?
If you are facing difficulties viewing your TikTok account or Lead Generation Form in your bridge, please ensure you have the following Admin permissions:
If you have connected a user with access to the Ad Account through the TikTok Business Center, but it's not an Admin of the Ad Account. They need to request access to the Ad account first.
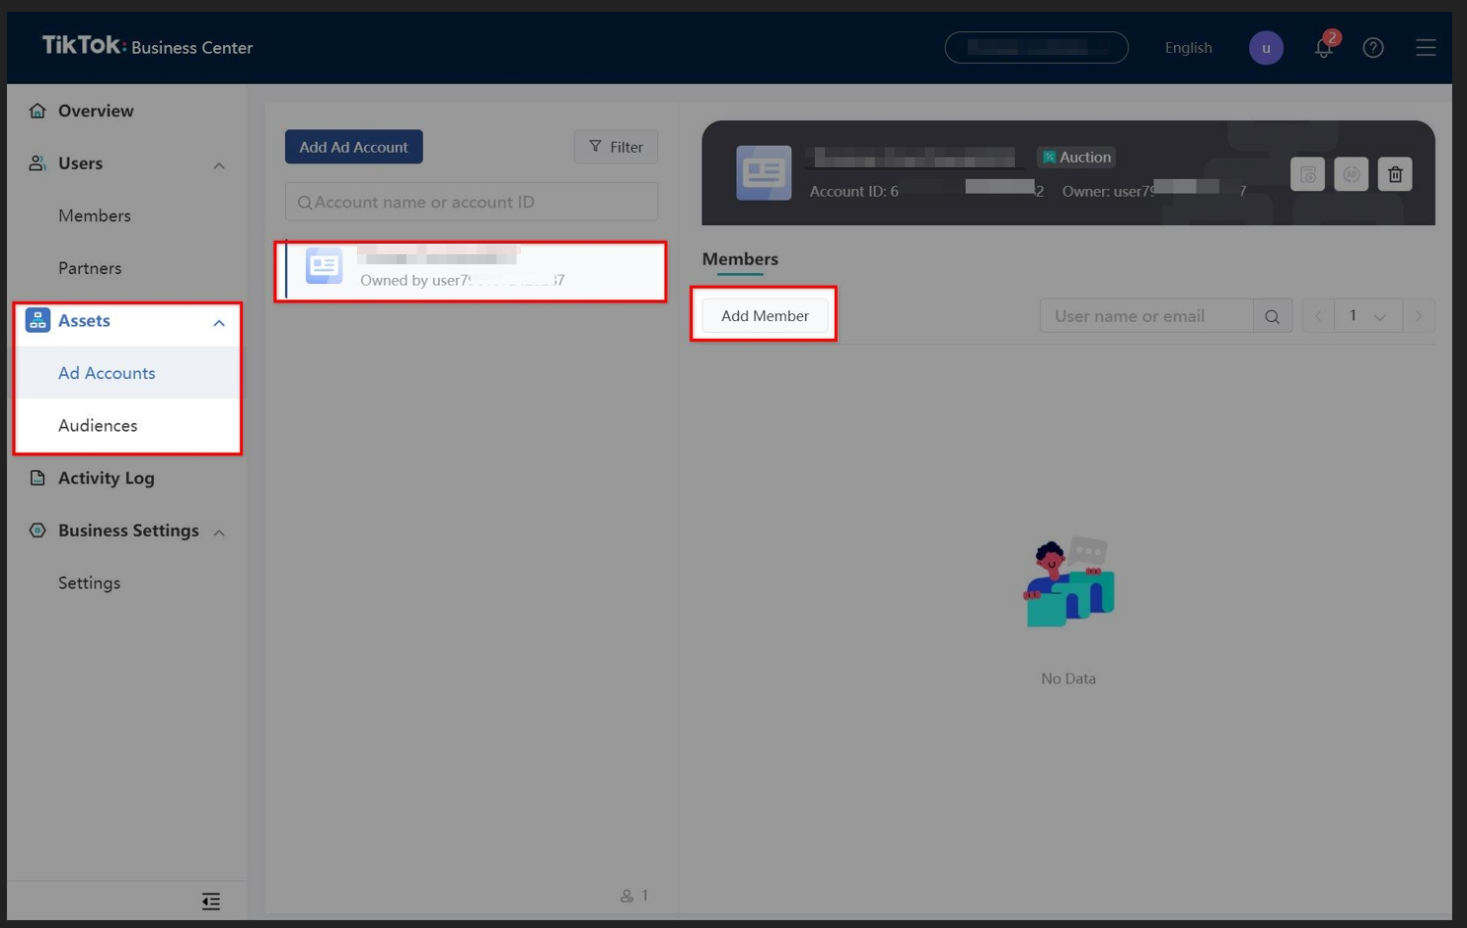
If you are an agency or private in charge of running Ads on the customer’s behalf, you need to grant the following permissions to connect with LeadsBridge:
In your Business Center account, navigate to Assets and click on Ad Accounts
Select your customer’s Ad Account and then click on Add Member
In the popup window, select your user and grant it Admin Permissions (If you have a Business Center account but you are not an Admin, please ask an Admin to complete the steps above)
How do I create a TikTok Instant Form?
How do I create a bridge with the TikTok Lead Generation Ads connector?
Do you need help?
Here some additional resources:
- TikTok Lead Generation documentation page and common questions
- NetSuite documentation page and common questions
- LeadsBridge KNOWLEDGE BASE
- Contact support from your account clicking on the top right Support button