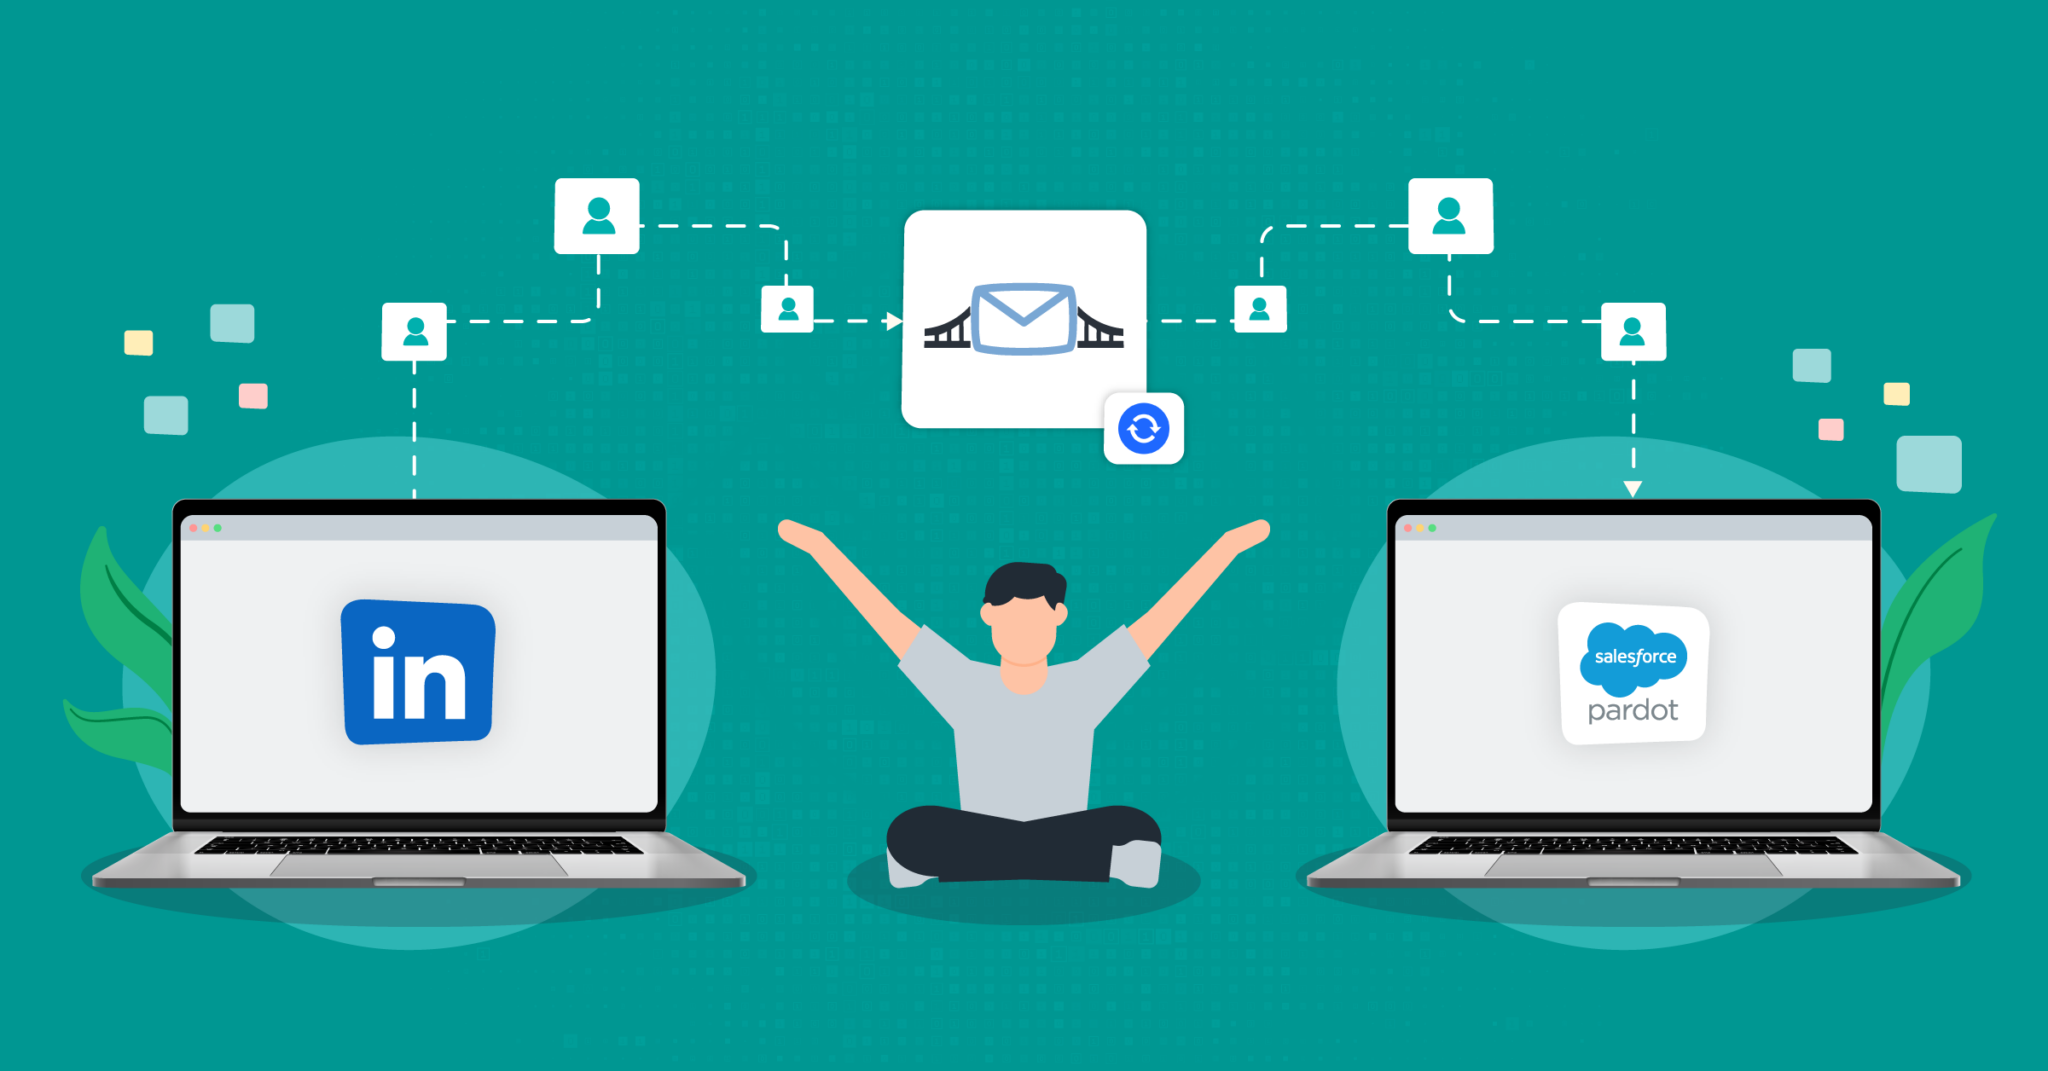
Connect LinkedIn Lead Gen Forms to NetSuite with LeadsBridge
In this article, you'll learn how to set up the bridge and connect LinkedIn Lead Gen Forms to My CRM Example using LeadsBridge.
Benefits
LinkedIn Lead Gen Forms is a solution that helps you drive high-quality leads from your Sponsored Content campaigns on Linkedin. These ads are particularly useful thanks to a design optimized for mobile devices. According to LinkedIn, 80% of involvement with sponsored content takes place on mobile devices. This creates a barrier when it comes to lead generation because many users will not take the time to fill out a form.
How to set up your bridge step-by-step tutorial
Before you start
- Head over to the left sidebar and click on the Create new Bridge green button
- You'll be taken to the first step of the bridge creation
Step 1: Choose the apps you want to connect
- Choose LinkedIn Lead Gen Forms as the source for your bridge
- Choose NetSuite as the destination for your bridge
- Click on the Continue button
- At this point you can choose a name for your bridge (this will only be visible inside LeadsBridge and you can also edit it later)
Step 2: Configure your LinkedIn Lead Gen Forms with NetSuite
Step 2.A: Setup your LinkedIn Lead Gen Forms integration
- Click on Connect LinkedIn Lead Gen Forms
- Click on Create new integration to connect your Ad account (or select an existing one from the dropdown if you already connected it)
- You will be prompted to the Ad platform authorization experience. Here you will need to grant LeadsBridge access on click on the Authorize button
- Once done, you can choose a name for this LinkedIn Lead Gen Forms and LeadsBridge integration (you can also edit it later)
- Once the authorization pop up is closed, you are ready to select from the dropdown the Ad Account and all the required parameters, including the form used to generate the leads.
- Now that your LinkedIn Lead Gen Forms is connected, you can set-up your bridge destination
Step 2.B: Setup your NetSuite integration
- Click on Connect NetSuite
- Click on Create new integration to connect your NetSuite (or select an existing one from the dropdown if you already connected it)
- A popup wil be opened where you can authorize the NetSuite integration
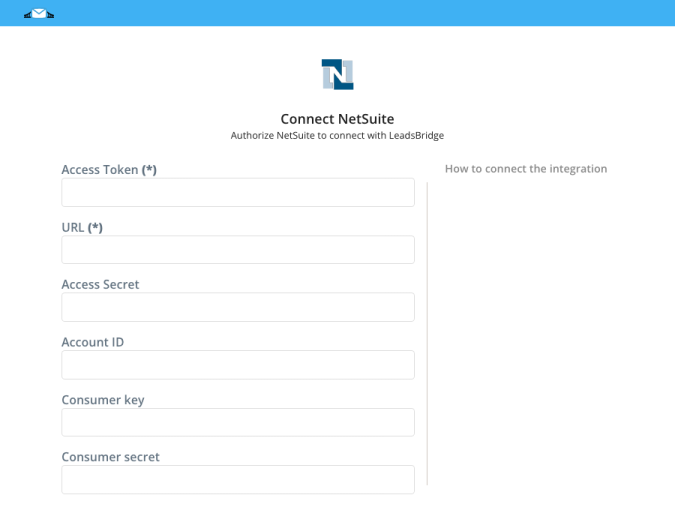
- Fill URL, Account ID, Consumer key, Consumer secret, Access Token, Access Secret field to connect NetSuite with LeadsBridge
- Click on the Authorize button
- You can choose a name for this NetSuite and LeadsBridge integration (you can also edit it later)
- Once done, click on Continue button and you will get back to the bridge experience where you could choose additional integration settings
- Now that your NetSuite is connected, you can continue with the set-up of your bridge
Step 2.C: Configuration details for NetSuite
How to get URL, Account ID, Consumer key, Consumer secret, Access Token, Access Secret
In order to get your URL and Account ID you should follow the steps below:
- Log into your NetSuite account as Administrator
- Go to Setup » Company » Company Information
![]()
- Your URL should look like one of the following cases:

- https://AccountID.suitetalk.api.netsuite.com
- https://AccountID.app.netsuite.com
- If those URL formats doesn't work, go back to the Company Information page and check the value of CUSTOMER CENTER LOGIN which contains the URL but use only the first part of it: https://XXX.netsuite.com where XXX depends on your account region.
After that, in order to get your Consumer Key and Consumer Secret, you should create an Integration inside NetSuite by follow the steps below:
- Log into your NetSuite account as Administrator
- Go to Setup » Integration » Manage Integrations » New
![]()
- Inside the Name field type a descriptive name, for example LeadsBridge Integration
- Keep State as Enabled
- Check the Token-Based Authentication checkbox in the Authentication section
- Then click on Save
- After that, Consumer Key and Consumer Secret will be displayed, copy them.
- Go back into your LeadsBridge Integration and paste your Consumer Key and Consumer Secret in their corresponding fields

To be able to create an Access Token you should enable your NetSuite account with Token-Based Authentication by following the steps below:
- Log into your NetSuite account as Administrator
- Go to Setup » Company » Enable Features
- Click on SuiteCloud sub tab
- Scroll down to Manage Authentication section
- Check the TOKEN-BASED AUTHENTICATION checkbox
- Save your changes
After this you should assign a role to the user’s account you are using inside LeadsBridge by following the steps below:
- Log into your NetSuite account as Administrator
- Go to Setup » Users/Roles » Manage Users
- Under the Name column click on the user’s name you want to give access
- Then click on Edit button under the user’s name
- Go into the Access sub-tab at the bottom
- Then click on the Add dropdown button under Roles, we recommend selecting Full Access or other similar roles
- Click again on Add to assign the role to the user
- After that, click on Save
Now we should create the Token for this user by following the steps below:
- Go to Setup » Users/Roles » Access Tokens » New
![]()
- Select an Application Name
- Under User select the user you assigned the Role in the step before
- Inside Role select the one you gave to the user in the step before, for example Full Access
- Under Token Name you can give a descriptive name to the Token you are creating
- Then click on Save button
![]()
- Now you should be able to see your Token ID and Token Secret
- Copy your NetSuite Token ID and paste it inside LeadsBridge Access Token field
- Finally, copy your NetSuite Token Secret and paste it inside LeadsBridge Access Secret field


Step 2.D: Email Receipt (Optional)
You may choose to receive an email receipt for each incoming lead.
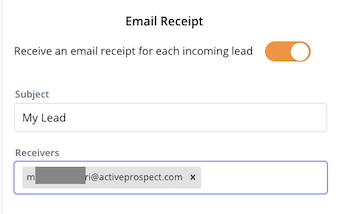
- Type the address(es) where you'd like to receive the receipt
- You may also modify the Subject line of the email
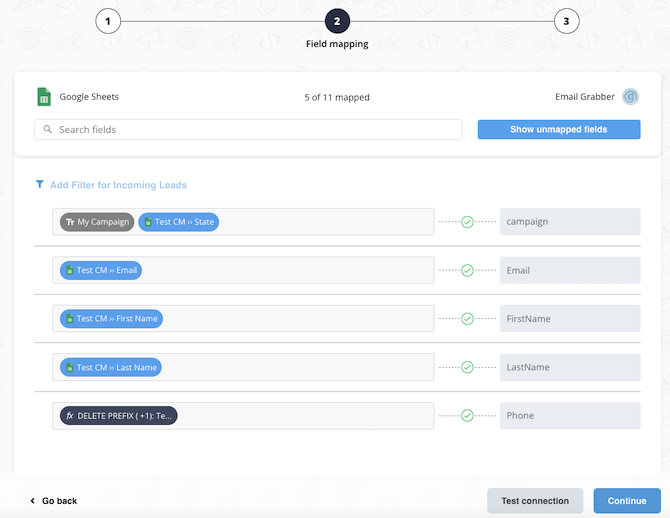
Step 3: Fields Mapping
Here you'll be able to map your LinkedIn Lead Gen Forms information with your NetSuite fields.
- You will have NetSuite fields on the left. Match the information you wish to pass align from LinkedIn Lead Gen Forms
- Based on NetSuite functionality, some fields might be required; if this is the case, you can identify those fields with a * (star), so be sure to map all them
- You can also use the functions to customize information like reformatting dates and times or modifying text, phone numbers and so on.
- You may leave blank the box of a field's information you don't want to send through. Clicking on the Show unmapped fields button you will have visibility on all the available fields still not mapped
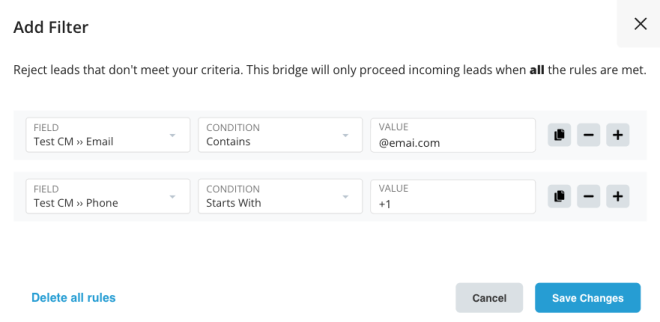
Step 3.A: Leads Filter (Optional)
If you'd like you could add a filter for incoming leads. This filter will sync only leads that meet the configured conditions
- Click on the link Add Filter for Incoming Leads on the top left
- A popup wil be opened where you can configure the filter
- You can define a series of condition to filter the leads. The lead will be synced only when all the conditions will be met
- Once finished, click the Save Changes button to switch back to the Fields Mapping to continue with the bridge configuration
Step 3.B Test Connection (Optional)
Once you’ve mapped all the fields that you need, if available, you can run a test of your connection by clicking on the Test Connection button.

Step 4: Save and Publish
- Click on the Save and publish button
Congratulations! Now your bridge is up and running
Common questions for LinkedIn Lead Gen Forms
What are LinkedIn Lead Gen Forms?
LinkedIn Lead Gen Forms are a powerful tool for advertisers. They allow the inclusion of a specific form in ads, pre-filled with user information from their LinkedIn profiles. This enhances the user experience by minimizing the manual filling of form fields and keeping users on LinkedIn instead of redirecting them to external websites.
How do LinkedIn Lead Gen Forms work?
These forms can be incorporated into sponsored content campaigns, both new and existing, and are compatible with various ad formats on LinkedIn's sponsored content and InMail platforms, accessible on desktop and mobile devices.
LinkedIn Lead Gen Forms allow users to perform in-app registrations, downloads, or click on specific call-to-action buttons featured on ads. When a user interacts with an ad, a pre-filled form is presented to them, containing information from their profile.
After clicking the "Sign up" button, the user will be shown a lead gen form, followed by a "Thank You" page with a message and a link back to the advertiser's website or desired destination.
All they need to do is confirm the information and submit the form. Once submitted, a report containing the user's name, email, company name, job title, location, and any additional information specified in the Lead Gen Forms is sent to the advertiser.
How to create a Lead Gen Form on LinkedIn
To create a lead gen form on LinkedIn, follow these steps:
- Go to the "Campaign Manager" and locate "Assets" on the left sidebar menu. Then, click on "Lead gen forms".
- Click on "Create form".
- The LinkedIn Lead Gen Form consists of four parts:
- Form details:
- Provide a name for your form.
- Choose a language that matches the profile language of your ad campaign.
- Create an enticing offer headline (less than 60 characters).
- Write a compelling description of your offer (160 characters).
- Add the URL linking to the Privacy Policy on your website.
- Include the Privacy Policy text (2000 character limit).
Lead details & custom questions:
- Select the contact information details you want to collect (e.g., First Name, Last Name, Email address, Phone number).
- Specify work details (job title, position, company, etc.).
- Add education details (degree, field of study, graduation details, etc.).
- Choose user demographics, such as gender.
- Customize the form by adding up to three custom questions and five custom checkboxes.
Confirmation:
- Set up the "Thank You" page that users will see after conversion.
- Create a thank you message and explain how you will communicate with the user.
- Provide a Landing Page URL with useful information.
- Select a relevant thank you message call-to-action from the drop-down menu.
Hidden fields (optional):
This requires integration with a third-party marketing automation platform. Hidden fields include details like the hidden agency ID to identify leads from your forms. - When completing all four sections, click “Agree & Create”.
How to download leads from LinkedIn Lead Gen Forms
To download leads from LinkedIn Lead Gen Forms, you have two options: manual download and automatic integration with your CRM or marketing automation tools.
- Manual Download: LinkedIn allows you to download leads manually in two ways: through the form or the campaign. In both ways, LinkedIn allows you to download leads in a CSV file.
- Automatic Download: If you prefer a more streamlined process, you can integrate your LinkedIn account with your CRM or marketing automation tools for automatic lead downloads. LinkedIn offers this feature through third-party providers like LeadsBridge.
By leveraging LeadsBridge LinkedIn Lead Gen Forms integration, you can collect leads directly into your CRM, enabling immediate follow-up and increasing conversion rates. This eliminates the need for manual downloads and provides a seamless experience for your leads.
How to create a LinkedIn Lead Gen Form integration
To create a LinkedIn Lead Gen Form integration, one effective method is to utilize the third-party automation integration provided by official partners like LeadsBridge. By using this integration, you can seamlessly connect your favorite marketing tools with hundreds of CRMs and email marketing software.
LeadsBridge offers a streamlined data transfer process, enabling you to quickly follow up with leads from LinkedIn Lead Gen Form. This automated approach ensures a smooth and seamless experience for your leads, ultimately increasing your conversion rates.
Overall, leveraging the power of the LinkedIn Lead Gen Form integration with LeadsBridge opens up new possibilities for optimizing lead generation and enhancing your overall marketing strategy.
Do you need help?
Here some additional resources:
- LinkedIn Lead Gen Forms documentation page and common questions
- NetSuite documentation page and common questions
- LeadsBridge KNOWLEDGE BASE
- Contact support from your account clicking on the top right Support button