Connect NetSuite to Facebook Custom Audiences with LeadsBridge
In this article, you'll learn how to set up the bridge and connect NetSuite to My CRM Example using LeadsBridge.
How to set up your bridge step-by-step tutorial
Before you start
- Head over to the left sidebar and click on the Create new Bridge green button
- You'll be taken to the first step of the bridge creation
Step 1: Choose the apps you want to connect
- Choose NetSuite as the source for your bridge
- Choose Facebook Custom Audiences as the destination for your bridge
- Click on the Continue button
- At this point you can choose a name for your bridge (this will only be visible inside LeadsBridge and you can also edit it later)
Step 2: Configure your NetSuite with Facebook Custom Audiences
Step 2.A: Setup your NetSuite integration
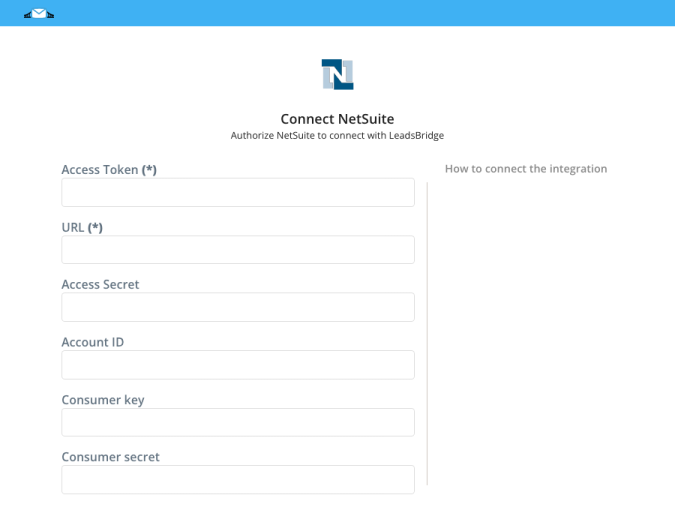
- Click on Connect NetSuite
- Click on Create new integration to connect your NetSuite (or select an existing one from the dropdown if you already connected it)
- A popup wil be opened where you can authorize the NetSuite integration
- Fill URL, Account ID, Consumer key, Consumer secret, Access Token, Access Secret field to connect NetSuite with LeadsBridge
- Click on the Authorize button
- You can choose a name for this NetSuite and LeadsBridge integration (you can also edit it later)
- Once done, click on Continue button and you will get back to the bridge experience where you could choose additional integration settings
- Now that your NetSuite is connected, you can continue with the set-up of your bridge
Step 2.B: Configuration details for NetSuite
How to get URL, Account ID, Consumer key, Consumer secret, Access Token, Access Secret
In order to get your URL and Account ID you should follow the steps below:
- Log into your NetSuite account as Administrator
- Go to Setup » Company » Company Information
![]()
- Your URL should look like one of the following cases:

- https://AccountID.suitetalk.api.netsuite.com
- https://AccountID.app.netsuite.com
- If those URL formats doesn't work, go back to the Company Information page and check the value of CUSTOMER CENTER LOGIN which contains the URL but use only the first part of it: https://XXX.netsuite.com where XXX depends on your account region.
After that, in order to get your Consumer Key and Consumer Secret, you should create an Integration inside NetSuite by follow the steps below:
- Log into your NetSuite account as Administrator
- Go to Setup » Integration » Manage Integrations » New
![]()
- Inside the Name field type a descriptive name, for example LeadsBridge Integration
- Keep State as Enabled
- Check the Token-Based Authentication checkbox in the Authentication section
- Then click on Save
- After that, Consumer Key and Consumer Secret will be displayed, copy them.
- Go back into your LeadsBridge Integration and paste your Consumer Key and Consumer Secret in their corresponding fields

To be able to create an Access Token you should enable your NetSuite account with Token-Based Authentication by following the steps below:
- Log into your NetSuite account as Administrator
- Go to Setup » Company » Enable Features
- Click on SuiteCloud sub tab
- Scroll down to Manage Authentication section
- Check the TOKEN-BASED AUTHENTICATION checkbox
- Save your changes
After this you should assign a role to the user’s account you are using inside LeadsBridge by following the steps below:
- Log into your NetSuite account as Administrator
- Go to Setup » Users/Roles » Manage Users
- Under the Name column click on the user’s name you want to give access
- Then click on Edit button under the user’s name
- Go into the Access sub-tab at the bottom
- Then click on the Add dropdown button under Roles, we recommend selecting Full Access or other similar roles
- Click again on Add to assign the role to the user
- After that, click on Save
Now we should create the Token for this user by following the steps below:
- Go to Setup » Users/Roles » Access Tokens » New
![]()
- Select an Application Name
- Under User select the user you assigned the Role in the step before
- Inside Role select the one you gave to the user in the step before, for example Full Access
- Under Token Name you can give a descriptive name to the Token you are creating
- Then click on Save button
![]()
- Now you should be able to see your Token ID and Token Secret
- Copy your NetSuite Token ID and paste it inside LeadsBridge Access Token field
- Finally, copy your NetSuite Token Secret and paste it inside LeadsBridge Access Secret field


Step 2.C: Setup your Facebook Custom Audiences integration
- Click on Create new integration to connect your Ad account (or select an existing one from the dropdown if you already connected it)
- You will be prompted to the Ad platform authorization experience. Here you will need to grant LeadsBridge access on click on the Authorize button
- Once done, you can choose a name for this Facebook Custom Audiences and LeadsBridge integration (you can also edit it later)
- Once the authorization pop up is closed, you are ready to select from the dropdown the Ad Account and all the required parameters, including the sync frequencies.
- Use Simulation functionality in order to test the source data and receive a report to verify the information processed
- Now that your Facebook Custom Audiences integration is fully set up too, you can click on the Continue button
Notes for the simulation mode: A published bridge with simulation ON is not sending any data, the simulation has to be switched off to have the audience being created, up and running on the Advertising platform. You can edit it later from inside the bridge if you want to go live and send the data.
Step 3: Fields Mapping
Here you'll be able to map your NetSuite information with your Facebook Custom Audiences fields.
- You will have Facebook Custom Audiences fields on the left. Match the information you wish to pass align from NetSuite
- Based on Facebook Custom Audiences functionality, some fields might be required; if this is the case, you can identify those fields with a * (star), so be sure to map all them
- You can also use the functions to customize information like reformatting dates and times or modifying text, phone numbers and so on.
- You may leave blank the box of a field's information you don't want to send through. Clicking on the Show unmapped fields button you will have visibility on all the available fields still not mapped
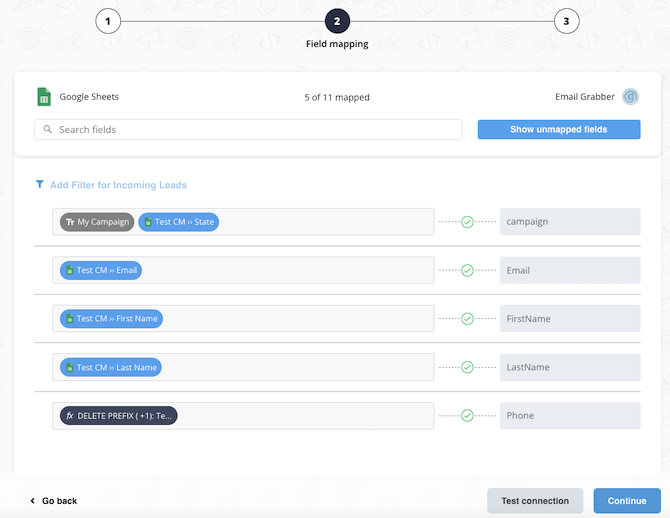
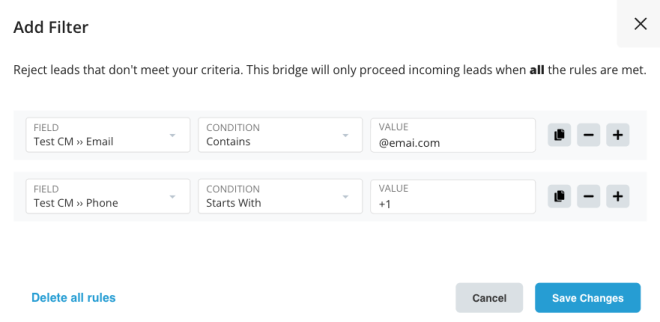
Step 3.A: Leads Filter (Optional)
If you'd like you could add a filter for incoming leads. This filter will sync only leads that meet the configured conditions
- Click on the link Add Filter for Incoming Leads on the top left
- A popup wil be opened where you can configure the filter
- You can define a series of condition to filter the leads. The lead will be synced only when all the conditions will be met
- Once finished, click the Save Changes button to switch back to the Fields Mapping to continue with the bridge configuration
Step 4: Save and Publish
- Click on the Save and publish button
Congratulations! Now your bridge is up and running
Common questions for Facebook Custom Audiences
How does Facebook Custom Audiences work?
Facebook Custom Audiences is a powerful precision-targeting tool designed to help businesses reach specific groups of individuals on the platform. It allows advertisers to create audience segments based on various criteria, such as website visitors, CRM customer lists, app activity, offline activity, and engagement with your brand.
Advertisers can use five types of Custom Audiences. Here's how Facebook Custom Audiences work:
- Website Custom Audiences: With the help of Facebook Pixel, you can track the actions of visitors on your website, such as the pages they viewed. By grouping these visitors based on their behavior, you can create custom audiences and target them with tailored ads.
- Customer List Custom Audiences: If you have a customer list or a list of subscribers, you can upload that data to Facebook. The platform will match the provided email or phone numbers with Facebook profiles, creating a custom audience based on your existing customers or subscribers.
- App Activity Custom Audiences: By integrating the Facebook SDK into your mobile app, you can collect data on user behavior within the app. This data can then be used to create custom audiences based on specific actions users have taken, allowing you to target those who are likely to engage with your app.
- Offline Activity Custom Audiences: For businesses with offline conversions, such as in-store purchases, Facebook offers the option to track and target these offline activities. By periodically updating the customer data and creating custom audiences based on recent offline interactions, you can exclude recent buyers and reach new potential customers.
- Engagement Custom Audiences: These Custom Audiences allow you to target users who have interacted with your brand across various platforms, including Facebook apps and services. This can include actions like watching videos, clicking on Facebook pages, or engaging with lead generation ads.
How to use Facebook Custom Audiences?
Facebook Custom Audiences can be utilized in multiple ways to enhance your ad campaigns. Here are some key advantages supported by case studies that demonstrate their effectiveness:
- Generate more qualified leads at a lower cost: by using Facebook Custom Audiences, you can reconnect with potential customers who have shown interest in your business but haven't made a purchase yet. Targeting these warm leads can result in higher-quality leads while minimizing costs.
- Drive quality traffic to your website: Facebook Custom Audiences can help increase the volume and quality of traffic directed to your website. By targeting specific audiences who are likely to engage with your content, you can drive more relevant traffic to your site.
- Drive in-store visits: If you have an offline store, Facebook Custom Audiences enables you to retarget customers who have previously made a purchase or engaged with your services. This can help drive repeat visits and enhance customer retention.
- Increase mobile app installations: Custom Audiences can also be leveraged to promote app installations. By targeting the right audience with your ads, you can boost the number of installs for your mobile app.
Overall, Facebook Custom Audiences is a powerful tool that allows you to maximize the impact of your ad campaigns, generate qualified leads, drive website traffic, increase in-store visits, and promote mobile app installations.
How to upload a Custom Audience to Facebook?
To upload a custom audience to Facebook, follow these steps:
- Download the CSV file of the leads or customers you want to target from your CRM or auto-responder.
- On the Custom Audiences page, select the "Customer list" option.
- There are two ways to build a custom audience from your customer lists:
a. Import manually from Marketing Software (e.g., Mailchimp):
- Click on "Import from Mailchimp."
- Follow the provided steps.
- Import a CSV or TXT file and format it correctly according to Facebook's guidelines.
- Ensure you include identifiers like email, phone, and names.
- Use Facebook's template to minimize mistakes.
- Click "Next" to proceed.
- Inform Facebook if your list includes customer values (e.g., importance to your business) for value-based Lookalike Audiences.
- Review and confirm the mapping of data columns with correct identifiers (e.g., emails, names).
- Click "Next" when ready.
- Upload your list, give your audience a name and description, specify the column containing customer values if applicable.
- Confirm the correct data mapping.
- Click "Import & Create" to complete the process.
b. Use automation by connecting your CRM with Facebook custom audiences:
Manually creating audiences can be time-consuming and error-prone. Streamline the process with automated data bridges like LeadsBridge integrations.
- These bridges connect your CRM segments, email marketing contacts, and customer lists with Facebook Custom Audiences.
- This method automates audience creation, ensures synchronization, and keeps your audiences up-to-date.
- LeadsBridge also respects users' preferences and complies with GDPR & CCPA regulations. It adds new contacts and removes opt-outs from the custom audience automatically.
Do Facebook Custom Audiences update automatically?
Yes, Facebook Custom Audiences can be updated automatically. This is done by pulling data from your website based on the specified rules you set. For example, if you set a rule to include visitors from the past 30 days, the audience will automatically add them.
However, managing this data manually can be inefficient. Alternatively, you can use LeadsBridge's Audience Targeting tool to sync CRM or email data automatically, saving time and ensuring seamless lead integration with reduced data errors. LeadsBridge automatically syncs contacts with your Facebook Custom Audience based on the selected time frame from the Sync Each dropdown in the Bridge configuration. You have the flexibility to choose between different time frames, such as 3, 6, 12, 24, or 48 hours.
How small can a Facebook Custom Audience be?
How to sync Custom Audiences on Facebook?
If you’d like to check that everything is working fine with your Custom Audience, please follow these steps:
- Click on the Facebook icon in the Custom Audiences Sync list. It will open the Custom Audience created by LeadsBridge and you can check if the contacts are correctly stored on Facebook.
- Check if the Custom Audience has been updated.
To make sure LeadsBridge is updating the Custom Audience correctly, please check the Custom Audience on Facebook inside the Audience History by clicking on the name of the Custom Audience.
How to check if my CRM/Autoresponder supports Custom Audiences?
To know if your CRM/ Autoresponder supports the Custom Audiences, please have a look at the list here https://leadsbridge.com/integrations/ and search for the required CRM/Autoresponder.
Once done, click on it, and on the popup page, search for Custom Audience.
You may also contact our Support team if you have any questions, feel free to drop us a line.
Do you need help?
Here some additional resources:
- NetSuite documentation page and common questions
- Facebook Custom Audiences documentation page and common questions
- LeadsBridge KNOWLEDGE BASE
- Contact support from your account clicking on the top right Support button