Connect Google Ads lead form extensions to Marketo with LeadsBridge


In this article, you'll learn how to set up the bridge and connect Google Ads lead form extensions to My CRM Example using LeadsBridge.
How to set up your bridge step-by-step tutorial
Before you start
- Head over to the left sidebar and click on the Create new Bridge green button
- You'll be taken to the first step of the bridge creation
Step 1: Choose the apps you want to connect
- Choose Google Ads lead form extensions as the source for your bridge
- Choose Marketo as the destination for your bridge
- Click on the Continue button
- At this point you can choose a name for your bridge (this will only be visible inside LeadsBridge and you can also edit it later)
Step 2: Configure your Google Ads lead form extensions with Marketo
Step 2.A: Setup your Google Ads lead form extensions integration
- Click on Connect Google Ads lead form extensions
- Click on Create new integration to connect your Ad account (or select an existing one from the dropdown if you already connected it)
- You will be prompted to the Ad platform authorization experience. Here you will need to grant LeadsBridge access on click on the Authorize button
- Once done, you can choose a name for this Google Ads lead form extensions and LeadsBridge integration (you can also edit it later)
- Once the authorization pop up is closed, you are ready to select from the dropdown the Ad Account and all the required parameters, including the form used to generate the leads.
- Now that your Google Ads lead form extensions is connected, you can set-up your bridge destination
Step 2.B: Setup your Marketo integration
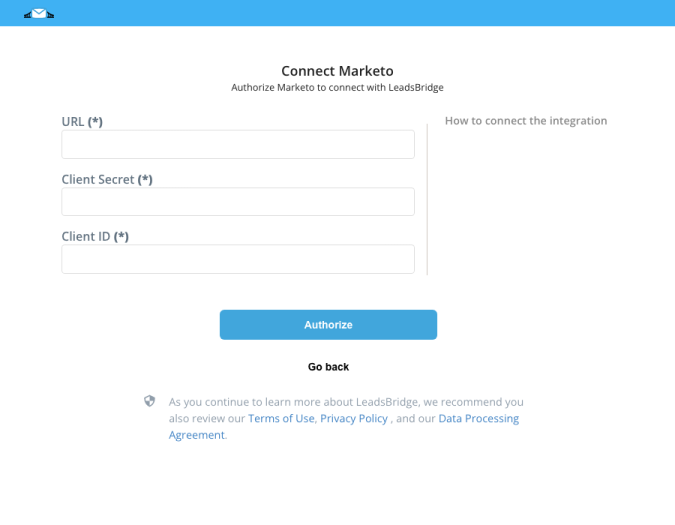
- Click on Connect Marketo
- Click on Create new integration to connect your Marketo (or select an existing one from the dropdown if you already connected it)
- A popup wil be opened where you can authorize the Marketo integration
- Fill Client ID, Client Secret, URL field to connect Marketo with LeadsBridge
- Click on the Authorize button
- You can choose a name for this Marketo and LeadsBridge integration (you can also edit it later)
- Once done, click on Continue button and you will get back to the bridge experience where you could choose additional integration settings
- Now that your Marketo is connected, you can continue with the set-up of your bridge

Step 2.C: Configuration details for Marketo
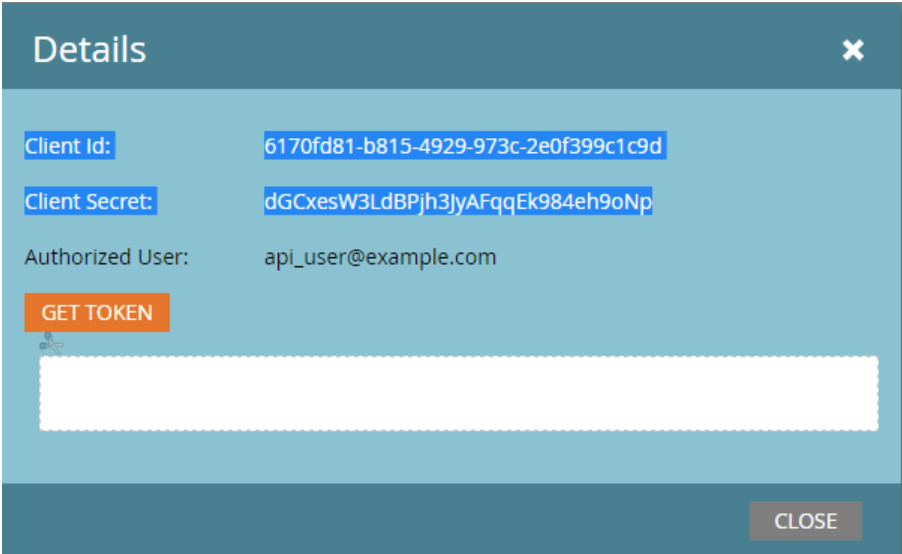
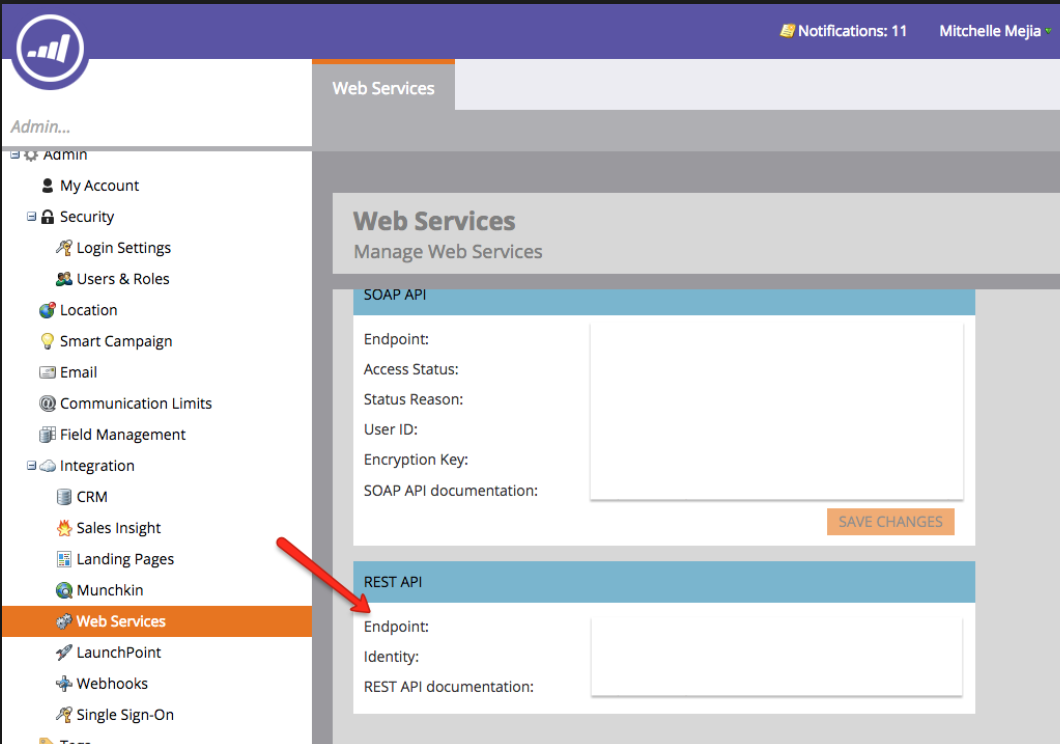
How to get Client ID, Client Secret, URL
- Login your Marketo account
- Go in the Admin section
- Click on LaunchPoint and View Details.

- Go in the Admin section
- Click on Web Services
- Go in the REST API section.

Step 2.D: Email Receipt (Optional)
You may choose to receive an email receipt for each incoming lead.
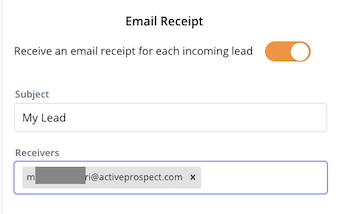

- Type the address(es) where you'd like to receive the receipt
- You may also modify the Subject line of the email
Step 3: Fields Mapping
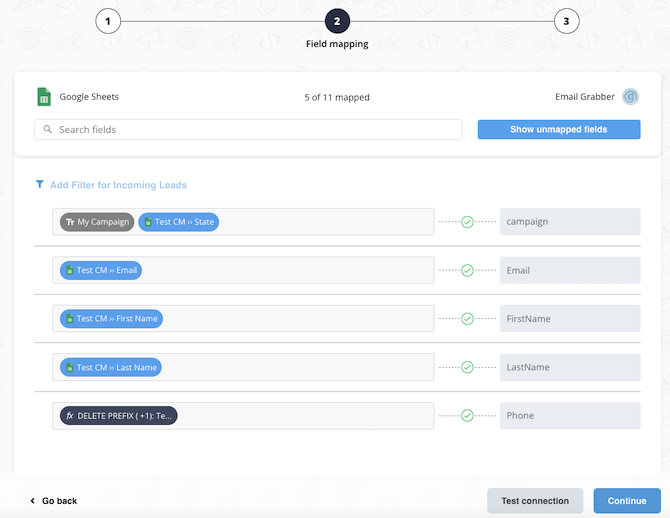
Here you'll be able to map your Google Ads lead form extensions information with your Marketo fields.
- You will have Marketo fields on the left. Match the information you wish to pass align from Google Ads lead form extensions
- Based on Marketo functionality, some fields might be required; if this is the case, you can identify those fields with a * (star), so be sure to map all them
- You can also use the functions to customize information like reformatting dates and times or modifying text, phone numbers and so on.
- You may leave blank the box of a field's information you don't want to send through. Clicking on the Show unmapped fields button you will have visibility on all the available fields still not mapped

Step 3.A: Leads Filter (Optional)
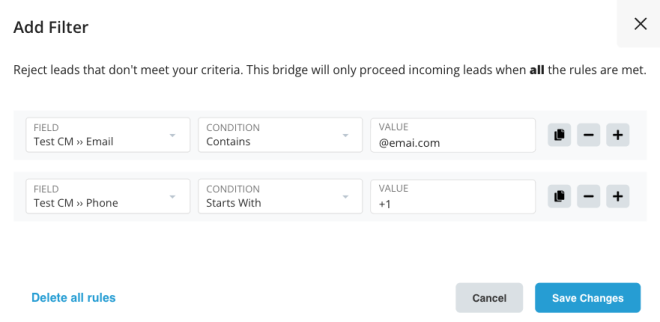
If you'd like you could add a filter for incoming leads. This filter will sync only leads that meet the configured conditions
- Click on the link Add Filter for Incoming Leads on the top left
- A popup wil be opened where you can configure the filter
- You can define a series of condition to filter the leads. The lead will be synced only when all the conditions will be met
- Once finished, click the Save Changes button to switch back to the Fields Mapping to continue with the bridge configuration

Step 4: Save and Publish
- Click on the Save and publish button
Congratulations! Now your bridge is up and running
Common questions for Google Ads lead form extensions
How do I create a Lead Form in Google Ads?
To create a Lead Form in Google Ads, follow these steps:
- Open a new window and log into your Google Ads account.
- Click on “Campaigns” on the left menu.
- Then, click on the “+ New Campaign” icon.
- Define your campaign objectives. If you're creating a new campaign, select “Leads” as the Campaign Goal, and click Continue.
- Select “Search” as the campaign type (assuming you're generating leads only).
- Choose “Lead Form submissions” as the method to reach your goal. Click Continue.
- Set up extensions by configuring Budget and bidding, Campaign settings, and Keywords and ads. Then, find “Extensions” on the left side panel, click on “More extensions”, and select “Lead Form Extensions”. Click Continue.
- Fill in all the required information to create the lead form under the “Add lead form extension”. Note that LeadsBridge can only retrieve the selected values under the Questions section.
- If you want to automatically secure your leads in your CRM, open the Lead delivery option and paste the Webhook URL and Google Key into your LeadsBridge account for integration. Run a test to ensure everything is working.
- Find “Submission Message” and provide the requested information, including a Headline, Description, CTA, and link.
- Navigate to the “Ad section” and submit the necessary information to finalize your ad.
- Finish your campaign setup and publish it. Once completed, you can start acquiring leads and storing them securely in your CRM.
Note that advertisers have the option to select their Call-to-Action and Extension Text, as well as choose a Headline, Business Name, and Description of up to 200 characters.
Additionally, advertisers can decide which information to collect from prospects (name, email address, phone number, and zip code). It's also possible to add an image in the background and include a link to the privacy policy, clearly explaining that the collected information will be used for marketing purposes.
( Learn more)How to get a $500 Google ad credit by creating your Google Ads account through LeadsBridge
If you are a new Google advertiser and create your Google Ads account on LeadsBridge, you will receive a $500 Google ad credit!
Here's how the credit works:
- Creating a new Google Ads account through LeadsBridge is free!
- The offer is only available to new Google advertisers.
- You must spend at least $500 on Google Ads campaigns within the first 60 days to activate the offer.
- Once you reach $500 in ad spend, you will receive a $500 Google Ads credit to use on your campaigns (USD or equivalent currency).
- The promotion will be automatically applied to your Google Ads account (Tools → Billing → Promotions).
- The credit is valid until the end of the year and becomes spendable 31 days after being issued.
To create a Google Ads account on LeadsBridge, follow this step-by-step guide:
- Step 1: Log in to your LeadsBridge account or create one for free, if you don’t have one yet.
- Step 2: Click on "Google Suite" in the left-side panel. Select "Google Ads Accounts" from the drop-down menu.
- Step 3: Find and click on "Create new ads account".
- Step 4: Complete the Google Ads account creation process:
- Create: Fill in your information, Google account (email), timezone, and currency, then click "Continue".
- Activate: Fill in your billing information, including name, personal and billing address, and payment method. Once verified, you can proceed to the next step.
- Connect: Set your Customer Match Audience and start your Lead Gen Campaigns using the "Try now" buttons.
How can I connect a Google Ads account?
In order to connect a Google Ad account you should do the following:
- Make sure you’re logged into your Google Ads account, then log into your LeadsBridge account
- Go to Google Suite and click on Google Ads Accounts
- Then, click on the Add New button
- Click on the Google Account you want to connect
- Allow LeadsBridge to access your Google Account
- In the dropdown under Google Ads Account, select the Ad Account you want to connect (notice that only Manager Ad Accounts will be able to retrieve your Lead Forms)
- Finally, click on Save
How to create a Google lead form ads and CRM integration
Creating Google lead form ads and CRM integration involves seamlessly capturing lead information through a pre-filled form and promptly connecting with those leads through your CRM or email marketing platform.
By using a trusted third-party integrator and Google partner like LeadsBridge, you can establish a bridge between Google Ads and your CRM or email software, allowing for real-time synchronization of new leads.
This integration enables you to gain valuable insights into your leads and customers, optimize your marketing strategy, and track the success of your campaigns more effectively. With this integration, you can ensure quick and efficient delivery of promised offers and welcome messages to your leads, maximizing conversions and return on investment.
How to download leads from Google Ads automatically with LeadsBridge
Google Ads provides the option to download lead data in CSV format, which requires manual uploading to your CRM or marketing system. But using LeadsBridge integrations, you can automate this process and have your lead data sent directly to your CRM seamlessly.
If you choose to download leads from Google Ads automatically, you need to connect Google Ads lead form extensions with your CRM tool via LeadsBridge. You have two ways to do that:
- From your Google Ads account: As an official Google Partner, LeadsBridge’s third-party integrations are available on Google Ads. To integrate LeadsBridge, follow these steps:
- Sign in to your Google Ads account.
- Navigate to the page menu and click "Ads & Assets."
- Click "Assets."
- Select a Lead form from the list you see.
- Hover over the lead form asset and click edit (the pencil icon).
- On the "Export leads from Google Ads" tab, search for the App you want to link to.
- Authorize LeadsBridge.
- Select your LeadsBridge data integration. - From the LeadsBridge App: Create an account for free and refer to the step-by-step section provided in this documentation for detailed instructions on how to set it up.
Do you need help?
Here some additional resources:
- Google Ads lead form extensions documentation page and common questions
- Marketo documentation page and common questions
- LeadsBridge KNOWLEDGE BASE
- Contact support from your account clicking on the top right Support button


