Connect NetSuite to LinkedIn Matched Audiences with LeadsBridge


In this article, you'll learn how to set up the bridge and connect NetSuite to My CRM Example using LeadsBridge.
Benefits
LinkedIn Matched Audiences is a set of targeting tools that allow advertisers to better reach users on the platform using their own data. LinkedIn already provides a unique and convenient way to target members by company, industry, skills, titles, and more.
How to set up your bridge step-by-step tutorial
Before you start
- Head over to the left sidebar and click on the Create new Bridge green button
- You'll be taken to the first step of the bridge creation
Step 1: Choose the apps you want to connect
- Choose NetSuite as the source for your bridge
- Choose LinkedIn Matched Audiences as the destination for your bridge
- Click on the Continue button
- At this point you can choose a name for your bridge (this will only be visible inside LeadsBridge and you can also edit it later)
Step 2: Configure your NetSuite with LinkedIn Matched Audiences
Step 2.A: Setup your NetSuite integration
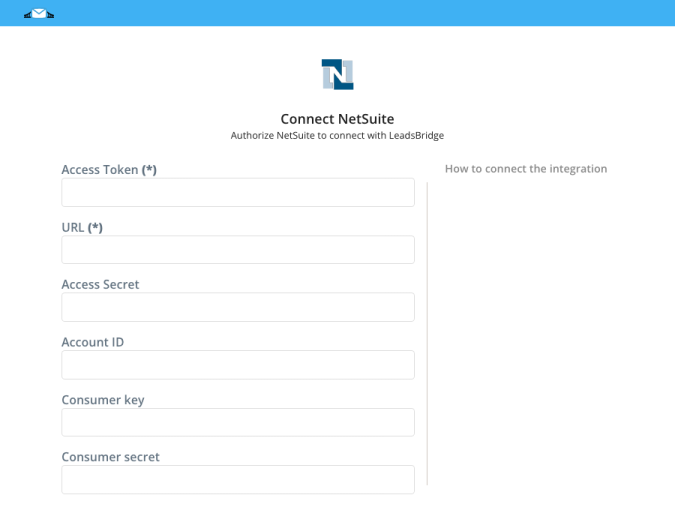
- Click on Connect NetSuite
- Click on Create new integration to connect your NetSuite (or select an existing one from the dropdown if you already connected it)
- A popup wil be opened where you can authorize the NetSuite integration
- Fill URL, Account ID, Consumer key, Consumer secret, Access Token, Access Secret field to connect NetSuite with LeadsBridge
- Click on the Authorize button
- You can choose a name for this NetSuite and LeadsBridge integration (you can also edit it later)
- Once done, click on Continue button and you will get back to the bridge experience where you could choose additional integration settings
- Now that your NetSuite is connected, you can continue with the set-up of your bridge

Step 2.B: Configuration details for NetSuite
How to get URL, Account ID, Consumer key, Consumer secret, Access Token, Access Secret
In order to get your URL and Account ID you should follow the steps below:
- Log into your NetSuite account as Administrator
- Go to Setup » Company » Company Information
![]()

- Your URL should look like one of the following cases:
- https://AccountID.suitetalk.api.netsuite.com
- https://AccountID.app.netsuite.com
- If those URL formats doesn't work, go back to the Company Information page and check the value of CUSTOMER CENTER LOGIN which contains the URL but use only the first part of it: https://XXX.netsuite.com where XXX depends on your account region.
After that, in order to get your Consumer Key and Consumer Secret, you should create an Integration inside NetSuite by follow the steps below:
- Log into your NetSuite account as Administrator
- Go to Setup » Integration » Manage Integrations » New
![]()

- Inside the Name field type a descriptive name, for example LeadsBridge Integration
- Keep State as Enabled
- Check the Token-Based Authentication checkbox in the Authentication section
- Then click on Save
- After that, Consumer Key and Consumer Secret will be displayed, copy them.
- Go back into your LeadsBridge Integration and paste your Consumer Key and Consumer Secret in their corresponding fields
To be able to create an Access Token you should enable your NetSuite account with Token-Based Authentication by following the steps below:
- Log into your NetSuite account as Administrator
- Go to Setup » Company » Enable Features
- Click on SuiteCloud sub tab
- Scroll down to Manage Authentication section
- Check the TOKEN-BASED AUTHENTICATION checkbox
- Save your changes
After this you should assign a role to the user’s account you are using inside LeadsBridge by following the steps below:
- Log into your NetSuite account as Administrator
- Go to Setup » Users/Roles » Manage Users
- Under the Name column click on the user’s name you want to give access
- Then click on Edit button under the user’s name
- Go into the Access sub-tab at the bottom
- Then click on the Add dropdown button under Roles, we recommend selecting Full Access or other similar roles
- Click again on Add to assign the role to the user
- After that, click on Save
Now we should create the Token for this user by following the steps below:
- Go to Setup » Users/Roles » Access Tokens » New
![]()

- Select an Application Name
- Under User select the user you assigned the Role in the step before
- Inside Role select the one you gave to the user in the step before, for example Full Access
- Under Token Name you can give a descriptive name to the Token you are creating
- Then click on Save button
![]()

- Now you should be able to see your Token ID and Token Secret
- Copy your NetSuite Token ID and paste it inside LeadsBridge Access Token field
- Finally, copy your NetSuite Token Secret and paste it inside LeadsBridge Access Secret field
Step 2.C: Setup your LinkedIn Matched Audiences integration
- Click on Create new integration to connect your Ad account (or select an existing one from the dropdown if you already connected it)
- You will be prompted to the Ad platform authorization experience. Here you will need to grant LeadsBridge access on click on the Authorize button
- Once done, you can choose a name for this LinkedIn Matched Audiences and LeadsBridge integration (you can also edit it later)
- Once the authorization pop up is closed, you are ready to select from the dropdown the Ad Account and all the required parameters, including the sync frequencies.
- Use Simulation functionality in order to test the source data and receive a report to verify the information processed
- Now that your LinkedIn Matched Audiences integration is fully set up too, you can click on the Continue button
Notes for the simulation mode: A published bridge with simulation ON is not sending any data, the simulation has to be switched off to have the audience being created, up and running on the Advertising platform. You can edit it later from inside the bridge if you want to go live and send the data.
Step 3: Fields Mapping
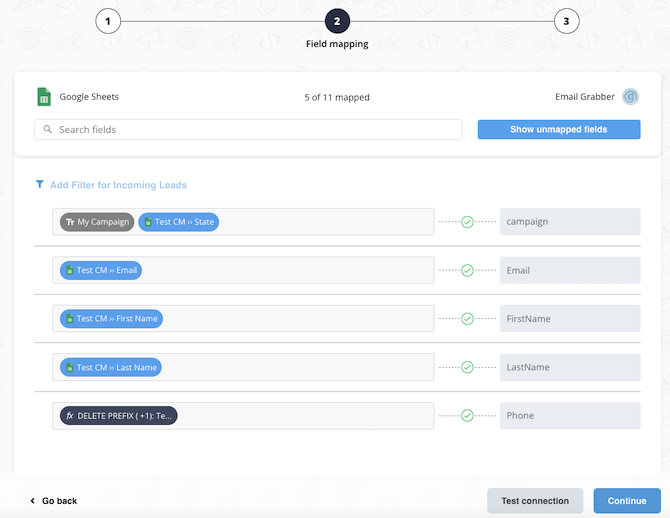
Here you'll be able to map your NetSuite information with your LinkedIn Matched Audiences fields.
- You will have LinkedIn Matched Audiences fields on the left. Match the information you wish to pass align from NetSuite
- Based on LinkedIn Matched Audiences functionality, some fields might be required; if this is the case, you can identify those fields with a * (star), so be sure to map all them
- You can also use the functions to customize information like reformatting dates and times or modifying text, phone numbers and so on.
- You may leave blank the box of a field's information you don't want to send through. Clicking on the Show unmapped fields button you will have visibility on all the available fields still not mapped

Step 3.A: Leads Filter (Optional)
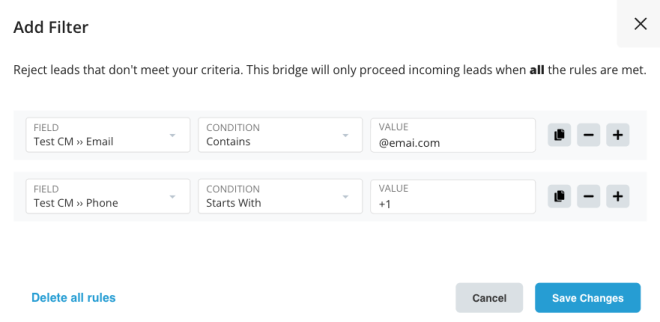
If you'd like you could add a filter for incoming leads. This filter will sync only leads that meet the configured conditions
- Click on the link Add Filter for Incoming Leads on the top left
- A popup wil be opened where you can configure the filter
- You can define a series of condition to filter the leads. The lead will be synced only when all the conditions will be met
- Once finished, click the Save Changes button to switch back to the Fields Mapping to continue with the bridge configuration

Step 4: Save and Publish
- Click on the Save and publish button
Congratulations! Now your bridge is up and running
Common questions for LinkedIn Matched Audiences
Why use LinkedIn Matched Audiences integrations
LinkedIn Matched Audiences integrations are crucial for streamlining your marketing efforts and maximizing engagement opportunities. By utilizing LeadsBridge's seamless integrations, you can effectively leverage your first-party data and retarget contacts already stored in your database. This ensures that your targeting remains precise and your marketing strategies are optimized for success. Incorporating LinkedIn Matched Audiences into your CRM through LeadsBridge can be a game-changer, enhancing your retargeting strategy on LinkedIn and keeping your audience consistently updated.
Can I connect LinkedIn Matched Audiences to Marketo?
Yes, you can connect LinkedIn Matched Audiences with Marketo through LeadsBridge. As a contact management platform, you can use a Marketo static list or smart list as a LinkedIn audience segment. This will allow you to automate the entire process, including list updates and data flows between the two applications.
See how to set up LinkedIn Matched Audiences - Marketo integration here.
( Learn more)What is LinkedIn Matched Audiences?
LinkedIn Matched Audiences is a powerful feature designed for retargeting website visitors and reaching out to contacts from CRM databases and marketing tools. It helps maximize your marketing efficiency by focusing on audiences likely to convert. By managing your LinkedIn target audience effectively and utilizing Lookalike Audiences, you can tailor your ads to specific user traits. This feature is compatible with Sponsored Content, Sponsored InMail, and other LinkedIn ad formats.
Learn more about LinkedIn Matched Audiences
( Learn more)Do you need help?
Here some additional resources:
- NetSuite documentation page and common questions
- LinkedIn Matched Audiences documentation page and common questions
- LeadsBridge KNOWLEDGE BASE
- Contact support from your account clicking on the top right Support button

