With more than 2.9 billion monthly users, Facebook offers great marketing potential for businesses of all sizes. Facebook advertising features help brands may want to raise brand awareness, increase Sales, and grow their business. However, running Facebook Ads without optimization leads to no results.
Before running Facebook lead ads, it’s essential to test them. This way, you can make sure your lead ads are helping you achieve your goals. This article will discuss running tests using the Facebook lead ads testing tool to optimize your ads for the best results.

Benefits of using Facebook lead form test tool
The Facebook lead ads testing tool allows you to test your lead ads before releasing them. Besides, you can use it to test the performance of your Lead Generation Form without viewing the Ads on the platform (Facebook).
Additionally, your bridge on LeadsBridge is already in active status once created. So the mock lead that is sent through this tool will also be synced with your destination. This way, you can confirm the connection between Facebook and your favorite marketing app works perfectly.
Another advantage of the lead ads testing tool is that it allows you to troubleshoot Facebook permission issues.
To learn more about Facebook lead ads, you can read our step-by-step guide here.
How to set up Facebook lead ads testing tool
Follow these steps to create a Facebook lead ad and test it with the lead form test tool.
Before you start
First, you need to create a Facebook Ads account. Find out how to start advertising on Facebook here.
Then, you’ll need a LeadsBridge account. If you don’t have one yet, you can create one here; it’s free!

Step 1: Create your bridge
LeadsBridge helps you connect your favorite marketing app to Facebook lead ads to streamline tasks. These data bridges allow automating tasks by extracting data from Facebook lead ads and conducting rule-based mapping to achieve a target outcome.

To set up your Facebook lead ads bridges, follow this step-by-step guide.
Step 2: Understanding the lead form test tool
At this point, you must have connected your “Source“, which is Facebook lead ads in this scenario, and “Destination” apps. Additionally, you have authorized the accounts and performed field mapping to decide which data to include in your bridge.
Now, it’s time to test the connection between your Facebook Form for lead ads and your destination platform (CRMs, Autoresponders, etc). Again, testing helps you to understand everything works flawlessly.
At the bottom of the field mapping screen, click on the “Testing” button.

Keep in mind that you will test the connection just with the destination and not the source. In practice, the “Test” phase of the bridge creation uses a mock API call to the system, which is used in the destination. Accordingly, it does not involve the source in this process.
Testing example:
To understand how the facebook lead ad testing tool works, have a look at the screenshots below; you’ll find a test with Google Sheets as the destination. Here, the lead is sent by LeadsBridge, not by Facebook.
1. Click on “Test connection”

2. Fill in the required information and click “Run test”.

3. Click “Save & publish”.

When using our testing tool, it’s important to remember that the mock lead sent by LeadsBridge cannot be found on Facebook.
Step three: Setting up your Facebook lead ads testing tool
1. Go to Facebook for Developers platform; the Facebook lead ads testing tool can be accessed there.
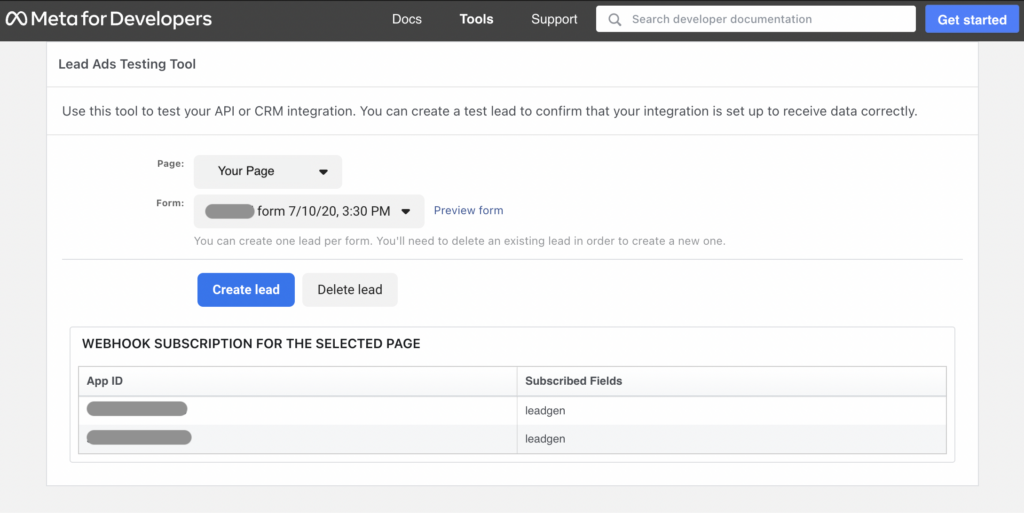
2. Select a “Page” and “Form”.
3. Click “Create lead”.
At this point, a new lead associated with the mentioned form will be created, along with an email, test@fb.com.
If the bridge is correctly set up, you will:
- See this lead in your CRM/other destination platforms.
- See this lead in the Leads Table of your bridge in green color and marked as Synced.
In case of errors, you’ll be able to see them in the Error Table related to your LB account here.
Troubleshooting tips
1. One lead testing option for each Form: The green code
Remember that every Facebook profile can only leave one lead per Form. If you’ve already sent a test lead and you need to send another one, you’ll first need to delete the priorly tested Form. Here’s how to do that:
- First, click on the “Delete lead” button;
- then, click on the “Create lead” button.
2. Leads rejected by the CRM: The red code
If your destination platform does not accept your mock lead, there’s a chance that some mandatory fields are missing. Once you sent the test lead from the Lead Ads Testing Tool and didn’t receive anything in your CRM (or other platforms), you should check the Leads Table of that bridge.
Here, you should be able to see the test lead in red. Click on the red Errors button and read which specifications of the error. For example, if you see a Server Error (500), it’s because the test@fb.com only has a limited number of fields, which makes it automatically rejected by most CRM/autoresponders.
If you want to insert a test lead and be able to edit the Form manually, click on the “Preview form” link in the Facebook lead form test tool. Then, manually edit the test/dummy info in all the Form fields and hit the Submit button once completed.
3. Leads are not sent to the CRM: The blue code
Another scenario is the blue code error. You sent a test lead using the Lead Form test tool and didn’t receive it in your destination app, but you are able to find it in the Leads Table marked in blue.
This color code means that LeadsBridge received your lead from Facebook but could not send it to the destination app due to a lack of permissions on the Facebook end.
It’s worth noting that if you keep clicking on the Track status button in the Lead Ads testing tool for about 15 seconds, you should be able to fix the problem.
Learn more about how to fix if leads sync issues from Facebook in real-time
Facebook lead ads integrations and testing with LeadsBridge
Since Facebook only holds on to your lead data for 90 days, it must be downloaded before that. You can either do it manually in CSV formats, through a code-heavy API, or automate the data transfer from Facebook to any point of your marketing stack. This is where LeadsBridge comes in.
In addition to streamlining these repetitive tasks, our platform enables you to follow up with your leads while they are still hot; according to the stats, speed-to-lead follow-ups result in 7 times higher ROI.
LeadsBridge is the first official partner of Facebook for integrating lead ads. Today, we provide several integrations that bridge the gap between Facebook lead ads integrations and 380+ CRM and other marketing apps, such as:
Besides other features, our Facebook lead ads Testing Tool is a part of our bridge creation process on the LeadsBridge dashboard to increase the effectiveness of your marketing efforts.
Get more information
To learn more about how to use the Facebook testing tool via LeadsBridge, check out the common questions on our LeadsBridge Help Center, or request a demo.